Ribbon Menu
The Ribbon menu allows you to quickly navigate between different pages and functions within the ZOLL emsCharts NOW application. The Ribbon menu is available from every page within the application, except the Signatures page, driver's license scanner, and ECG Import.
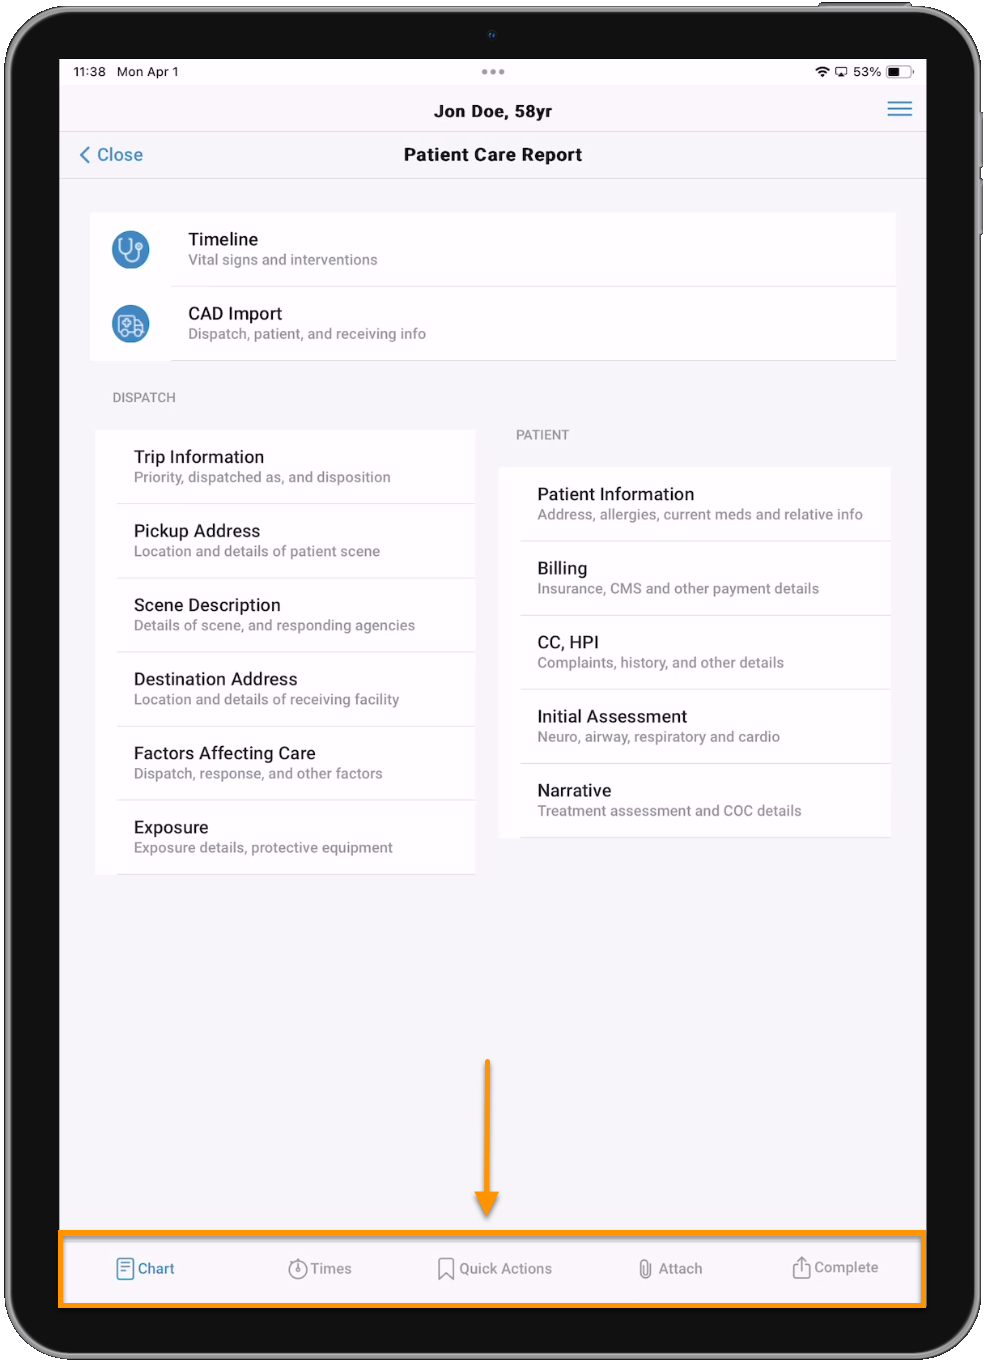
Jump to the option you want to learn more about.
Chart
Tap Chart to go back to the Patient Care Report screen.
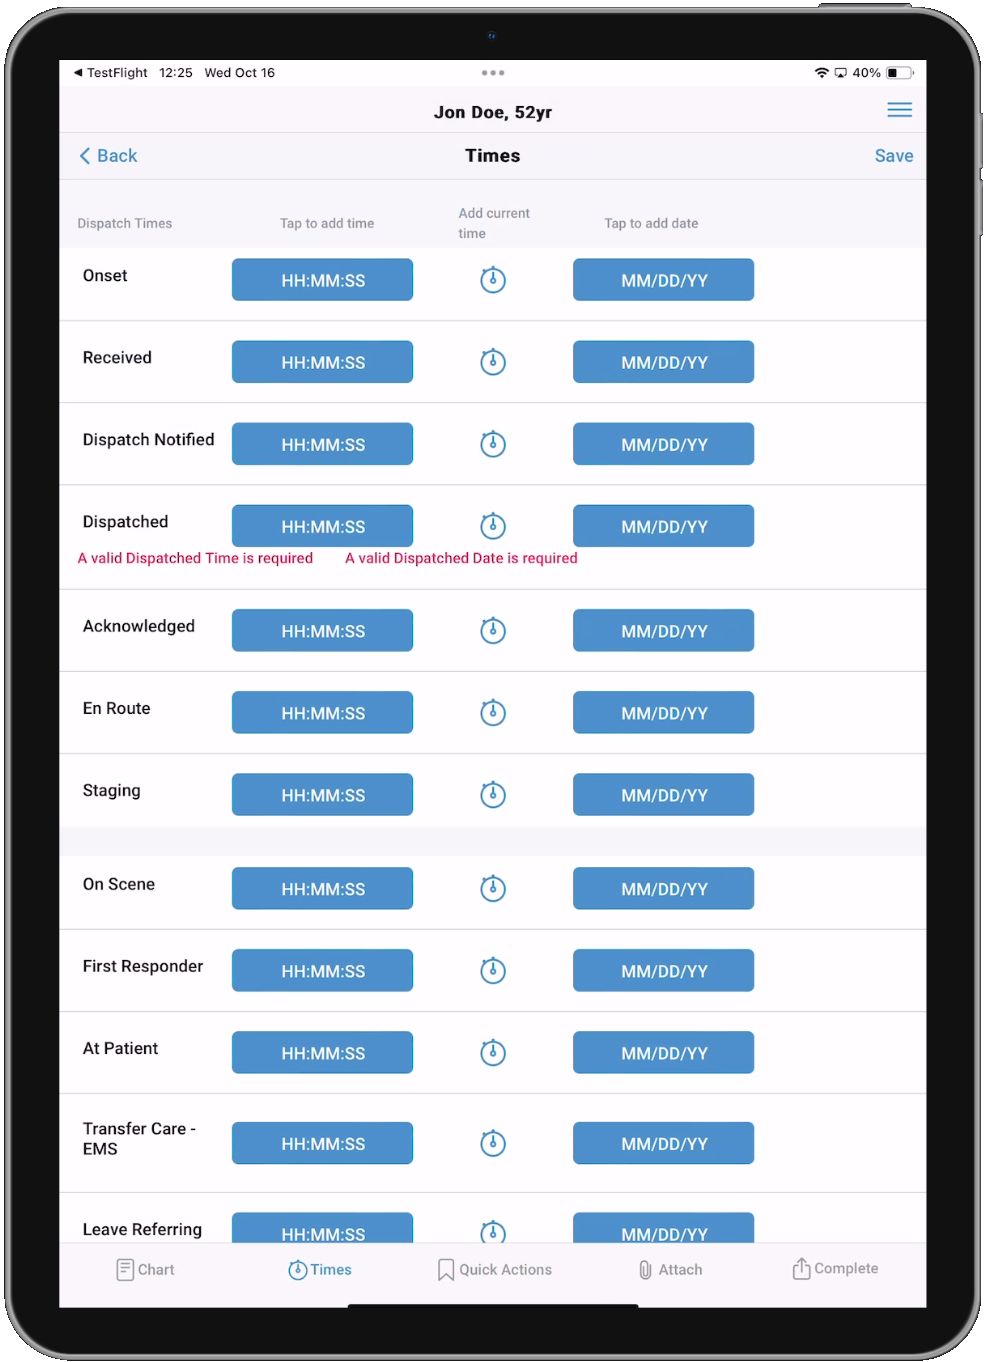
Times
Tap Times to review, add, or edit your chart times. You can tap into the time and date fields to manually enter a time and date, or you can tap the stopwatch icon  to automatically add the current date and time.
Note: The Times page does not include clinical timestamps.
Quick Actions
Quick Actions is one of two ways within ZOLL emsCharts NOW that you can add "Actions", also known as procedures. The other way to add procedures is via the Add Actions button on the Timeline.
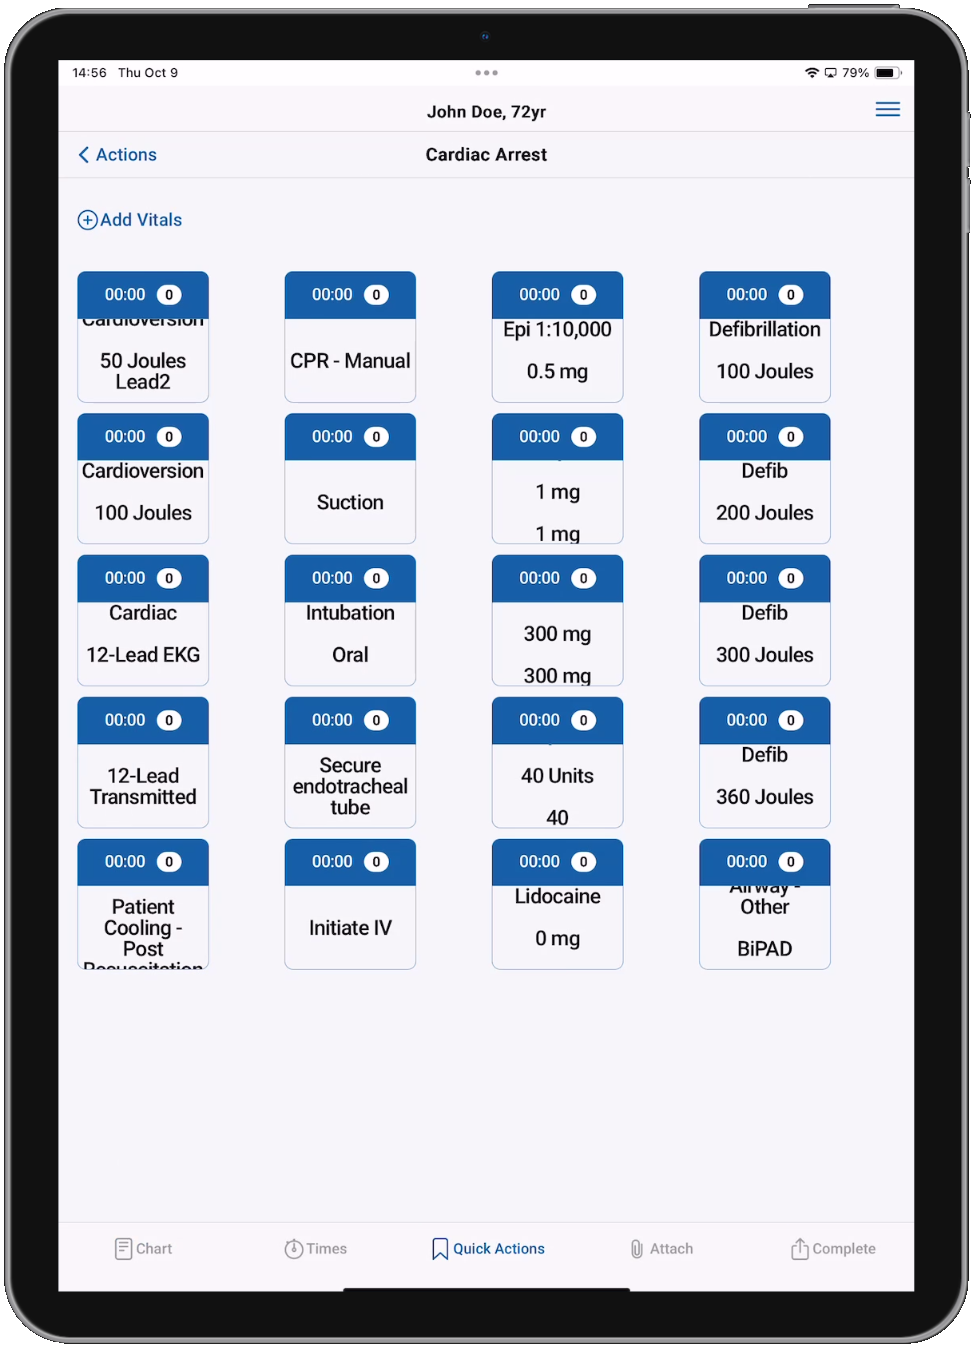
Quick Actions inherit all the Categories, and Buttons within each Category, from your ZOLL emsCharts system. Tapping a Quick Action Button will add that Action and the current time to your chart. Actions added using the Quick Actions Buttons can be viewed and deleted from the Timeline Activity Log.
Notes:
-
Administrators can configure Quick Actions Categories and Buttons in ZOLL emsCharts Web Configuration > Service > Code Tables > Quick Action Buttons.
-
You will receive local notifications outside of the ZOLL emsCharts NOW application for the expiration of Quick Action Button timers if the device is locked or if ZOLL emsCharts NOW is running in the background.

Quick Actions Categories
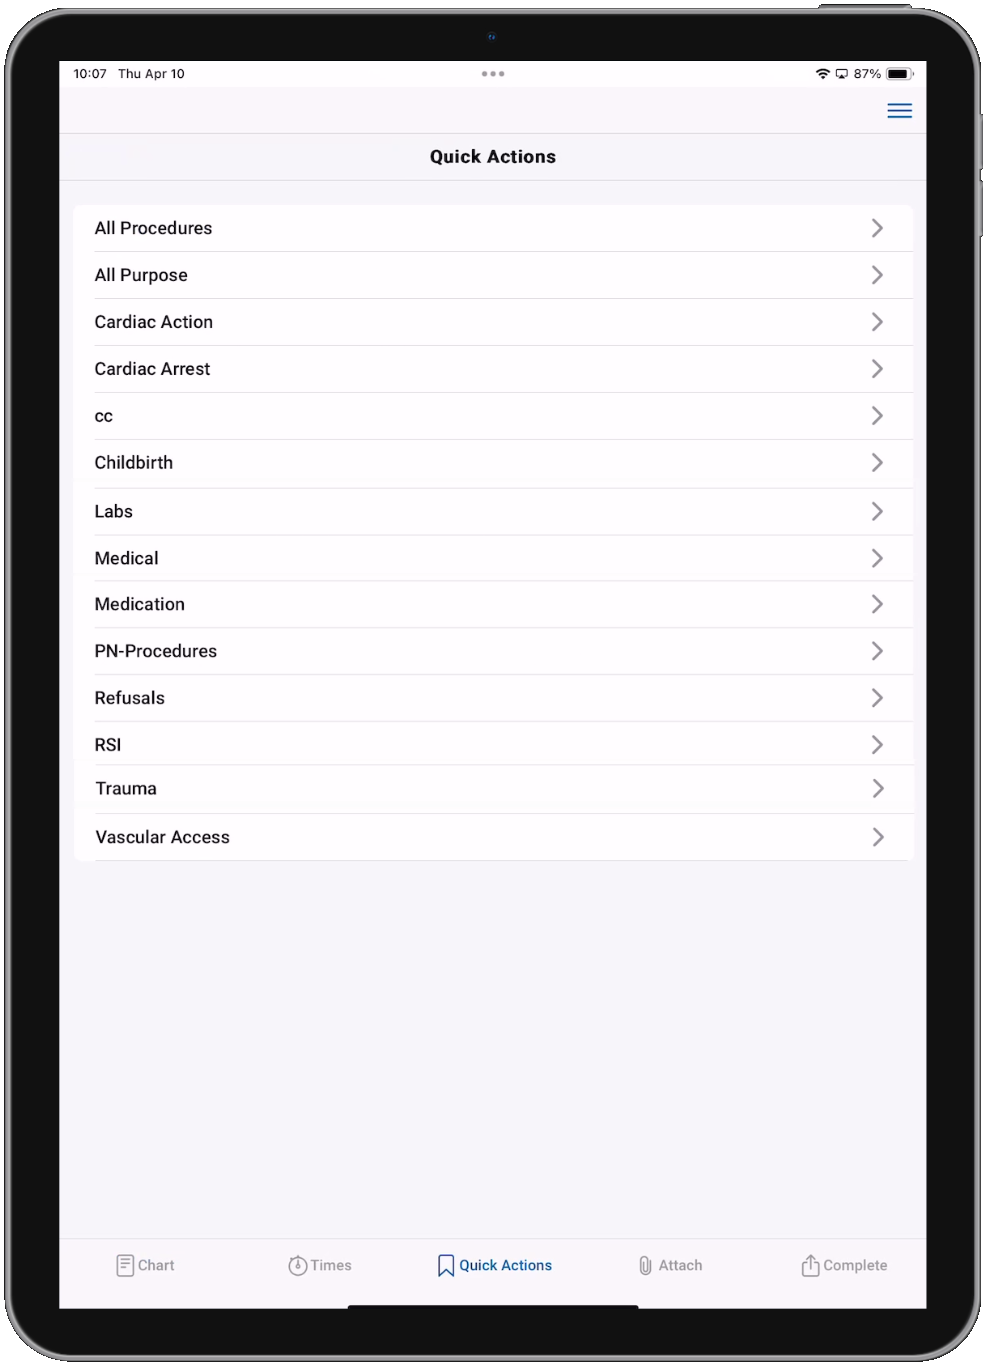
Quick Actions Buttons
Note: You can use the Add Vitals button in the top-left to quickly add vitals to the Timeline. Tapping Back after adding the vitals will take you right back to the Quick Action Buttons page.
Timeline Activity Log - swipe left on the Quick Action (or other item), then tap the trashcan icon to remove it.

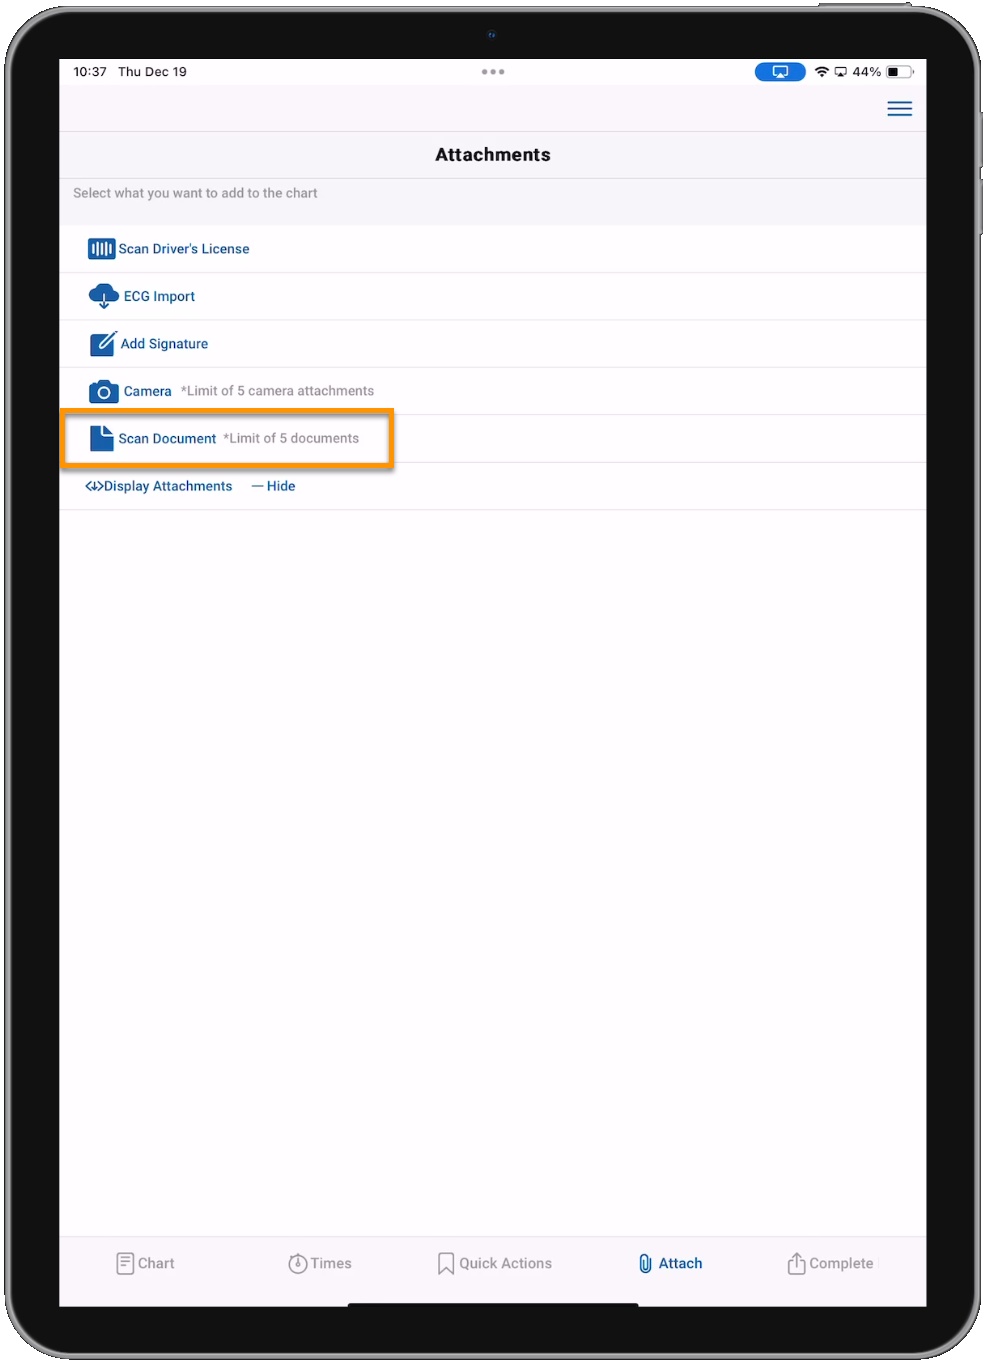
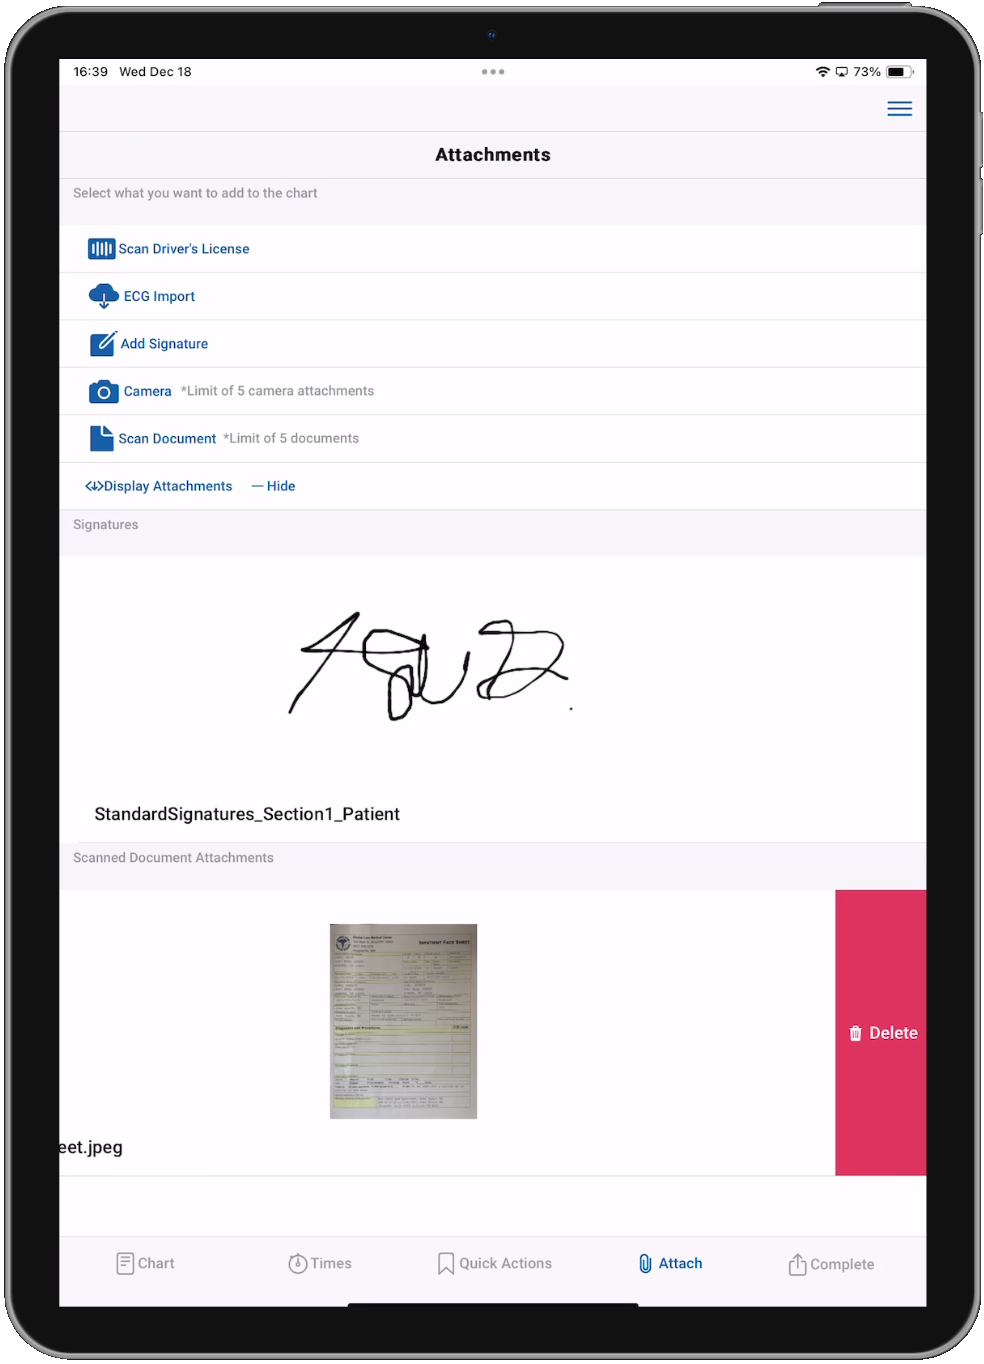
Attach (Attachments)
From the Attachments page, you can access the driver's license scanner, import ECG cases, add signatures, use the device's camera to capture images and scan documents, and view saved attachments. Learn more about the driver's license scanner or the ECG Import.
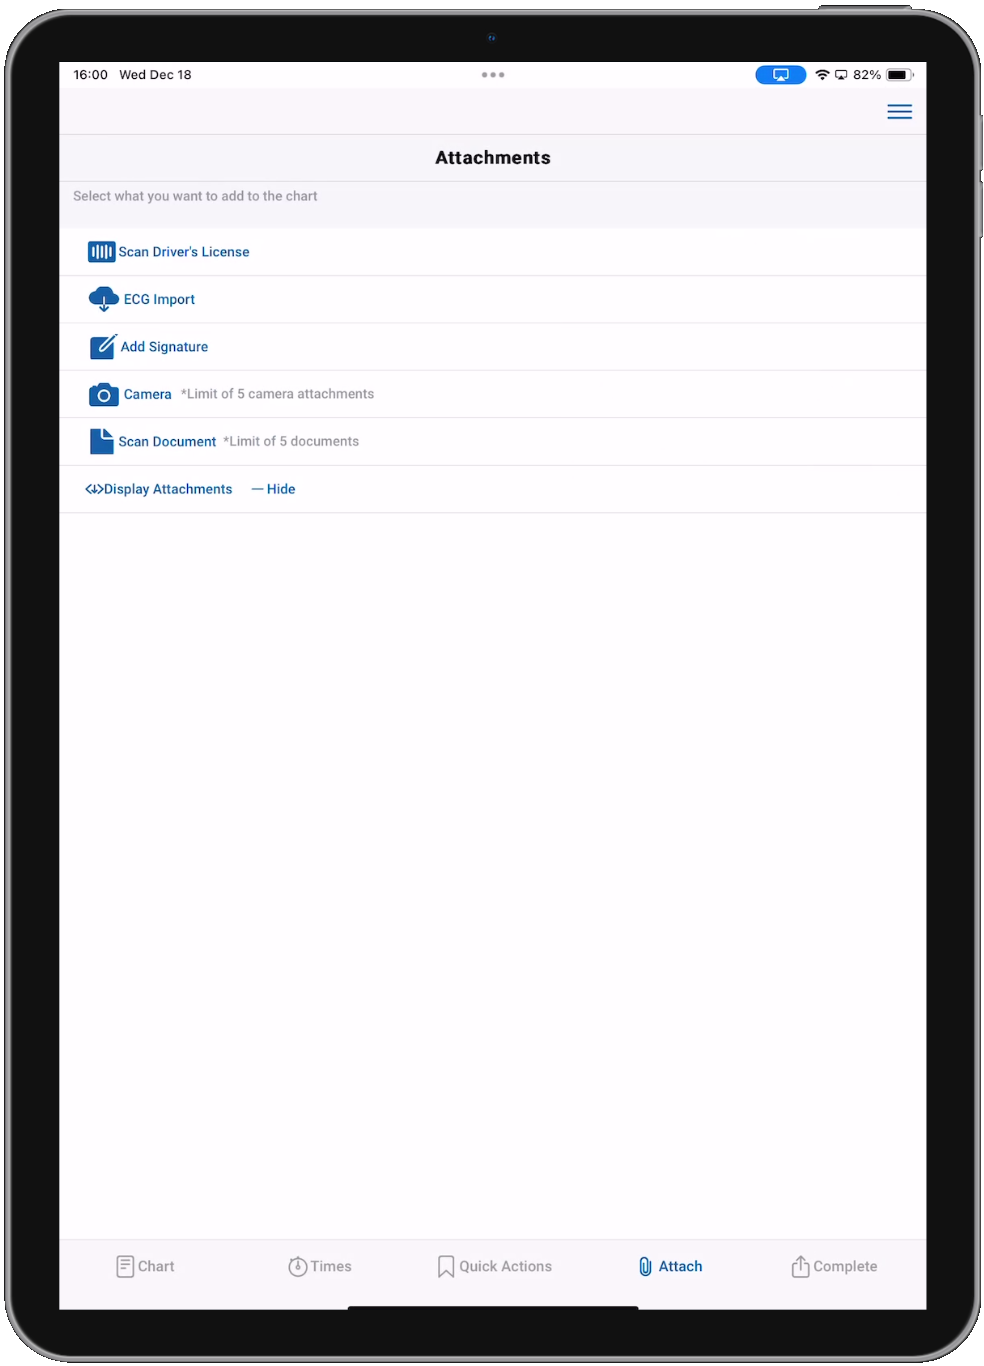
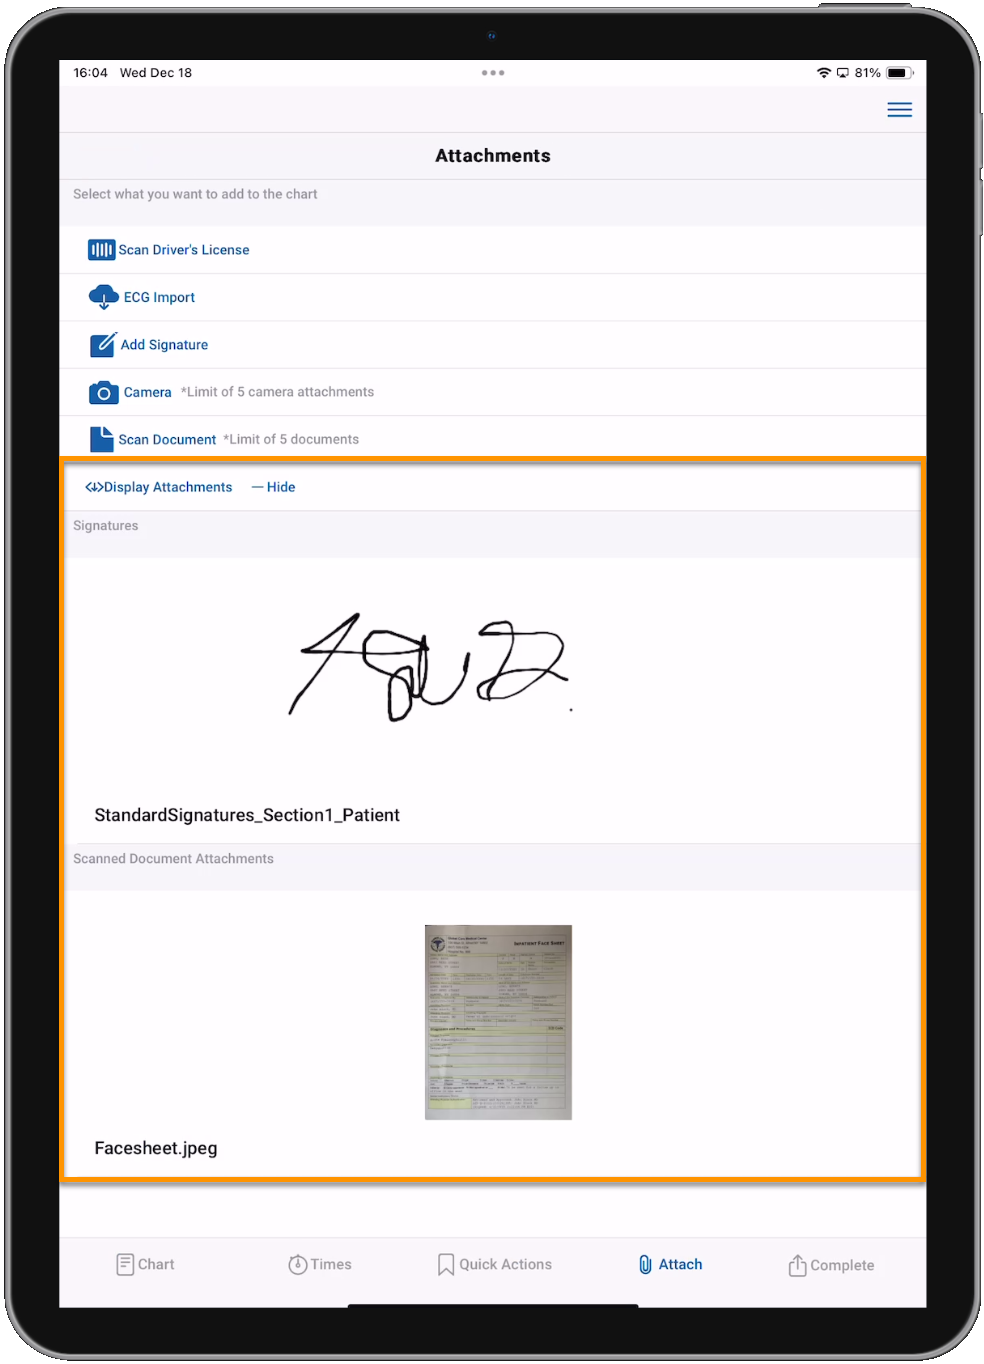
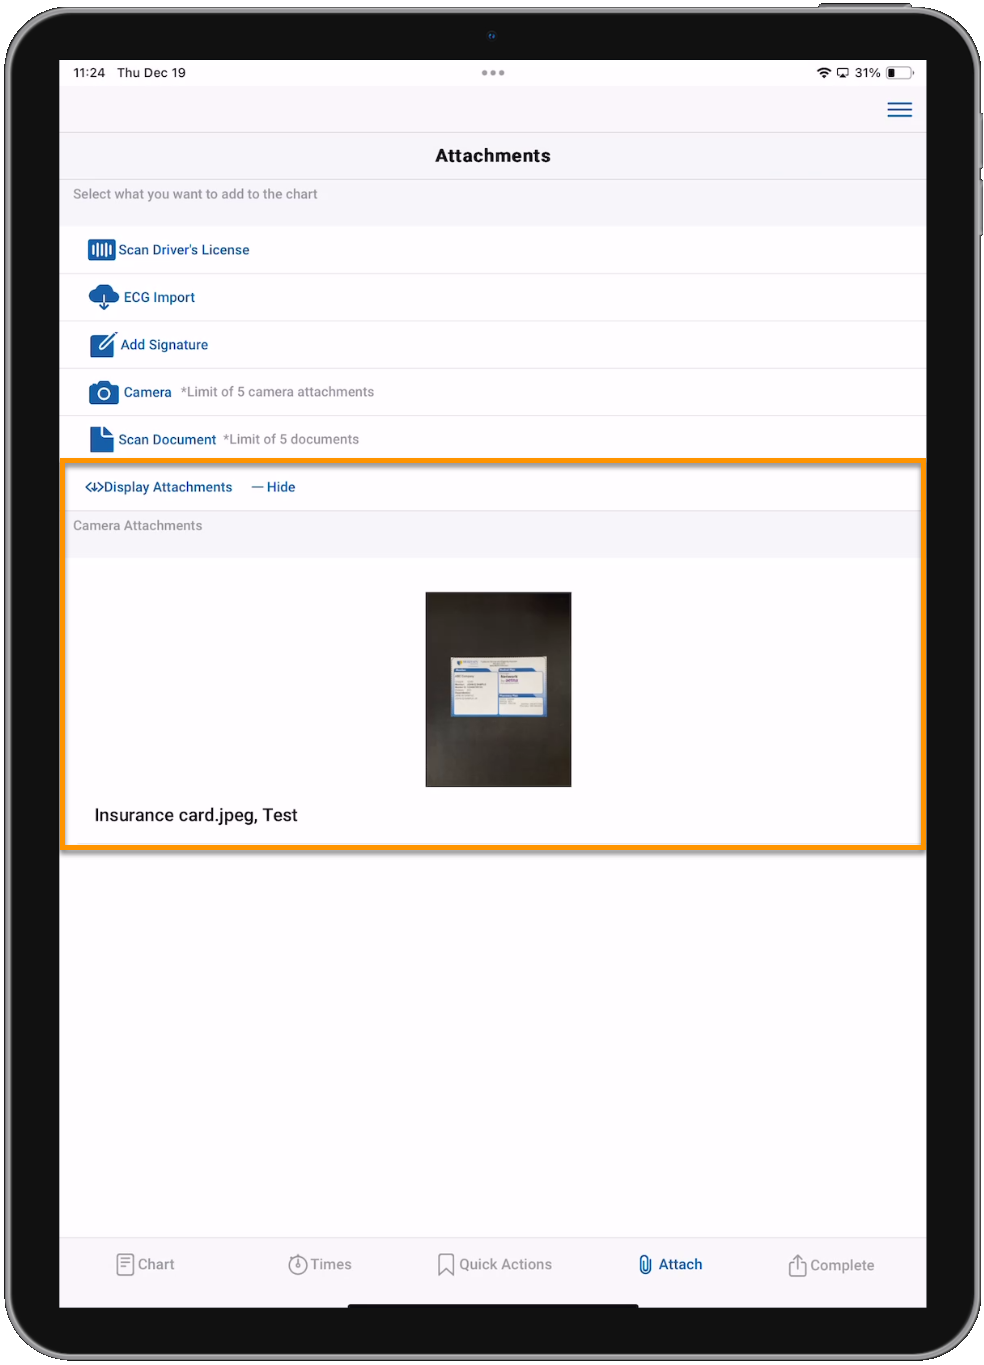
Tap Display Attachments to see your saved attachments. Tap Hide to hide them. You can zoom in on your saved camera attachments.
Add Signatures
The Signatures page is where you will capture your Standard and Custom signatures. The video below provides an overview of the Signatures page.

-
Tap the Standard/Custom toggle at the top to switch between Standard and Custom signatures. The process to add signatures is the same for both Standard and Custom signatures.
-
Tap the Signature Type drop-down to choose your Signature Type. For the remaining steps, we will be using Standard signatures.
Notes:
-
You can only add Standard signatures from one Signature Type Section (I, II, or III) to each chart. For example, if you add the "Patient Signature or Mark" from Section I, you can also add the "Witness" Signature Type from Section I but you cannot add the "Receiving Facility Signature" from Section III.
-
You can add as many Custom signatures as you want. There is no limit to the types of Custom signatures you can add.
-
Since every Service can have their own Custom signatures, only the Standard signatures are listed below.
Section I
-
Patient Signature or Mark
-
Witness
Section II
-
Representative Signature
Section III
-
Crew Signature
-
Receiving Facility Signature

-
-
Tap anywhere in the signature block to read the terms and conditions.

-
Tap I Agree to accept the terms and conditions.
Note: Service administrators can configure the terms and conditions in their respective ZOLL emsCharts Web Code Tables.
-
Standard signatures: Configuration > Service > Code Tables > Standard Signatures.
-
Custom signatures: Configuration > Service > Code Tables > Custom Forms.

-
-
Capture the signature in the unlocked signature block. Use the expand icon
 to increase the size of the signature block for easier signature capture. Use the X in the upper-right to clear the signature. Tap Save once the signature is captured to save it to the chart.
-
You will see a "Signature successfully attached" message when the signature is saved, and a chip will be placed at the bottom for each saved signature. Tapping a signature chip will open it for editing. Tapping the X on a signature chip will delete that signature. Tapping Clear All will delete all saved signatures from the chart.

Capture images with your device's camera
Capture images using the camera on your device. Images captured using this feature are saved directly to the chart as attachments and are not saved to the device's local photo gallery, or anywhere else on the device.
Note: A maximum of five images can be attached to a PCR in emsCharts NOW.
Watch this video for an overview of capturing images with the NOW application.
-
Tap Camera to open your device's camera.

-
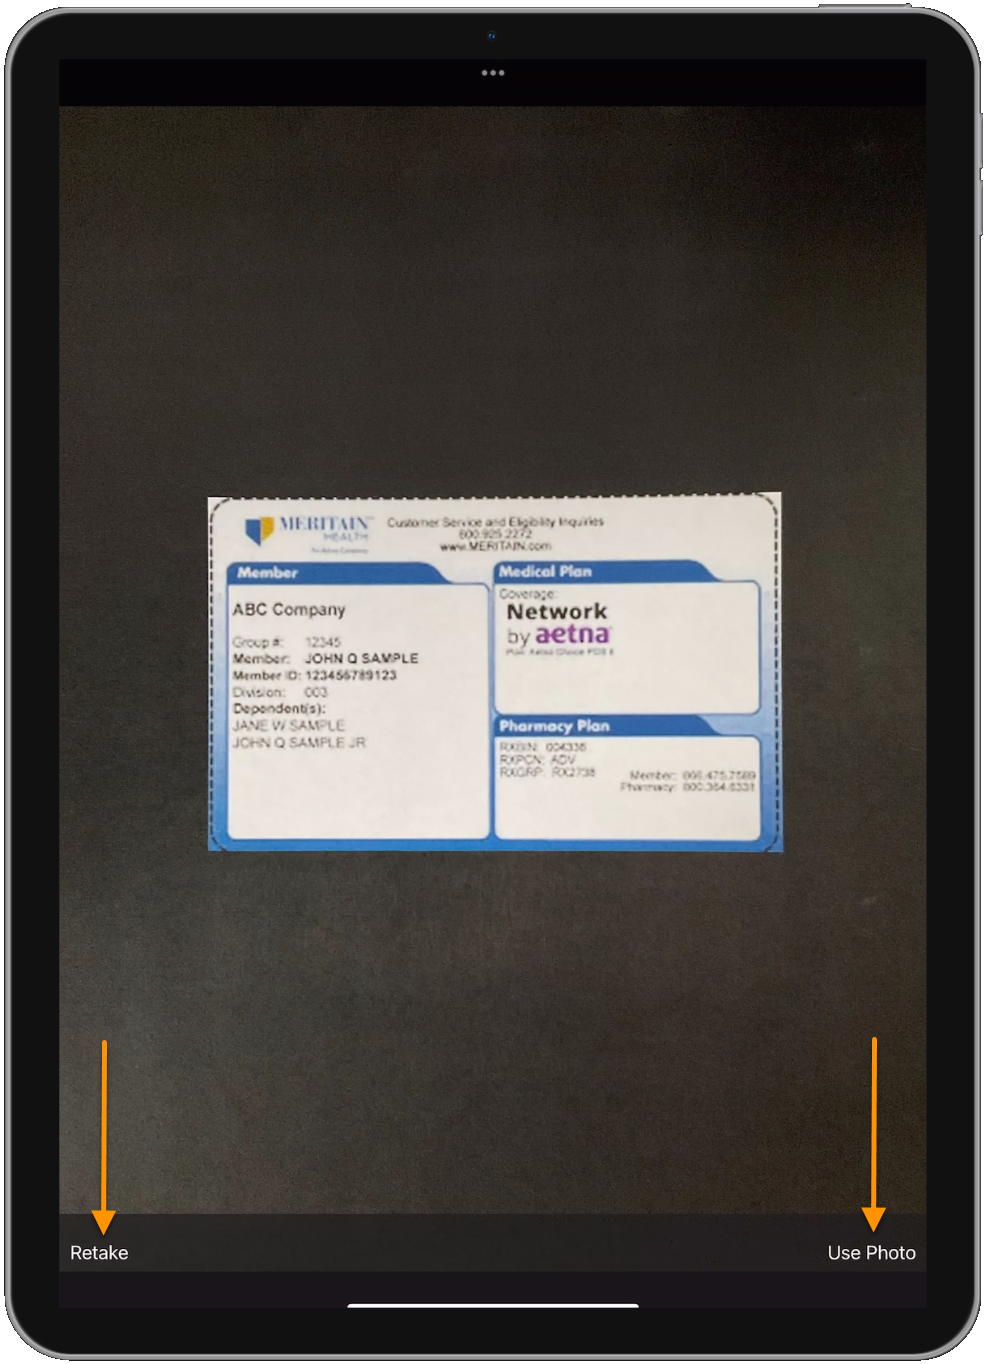
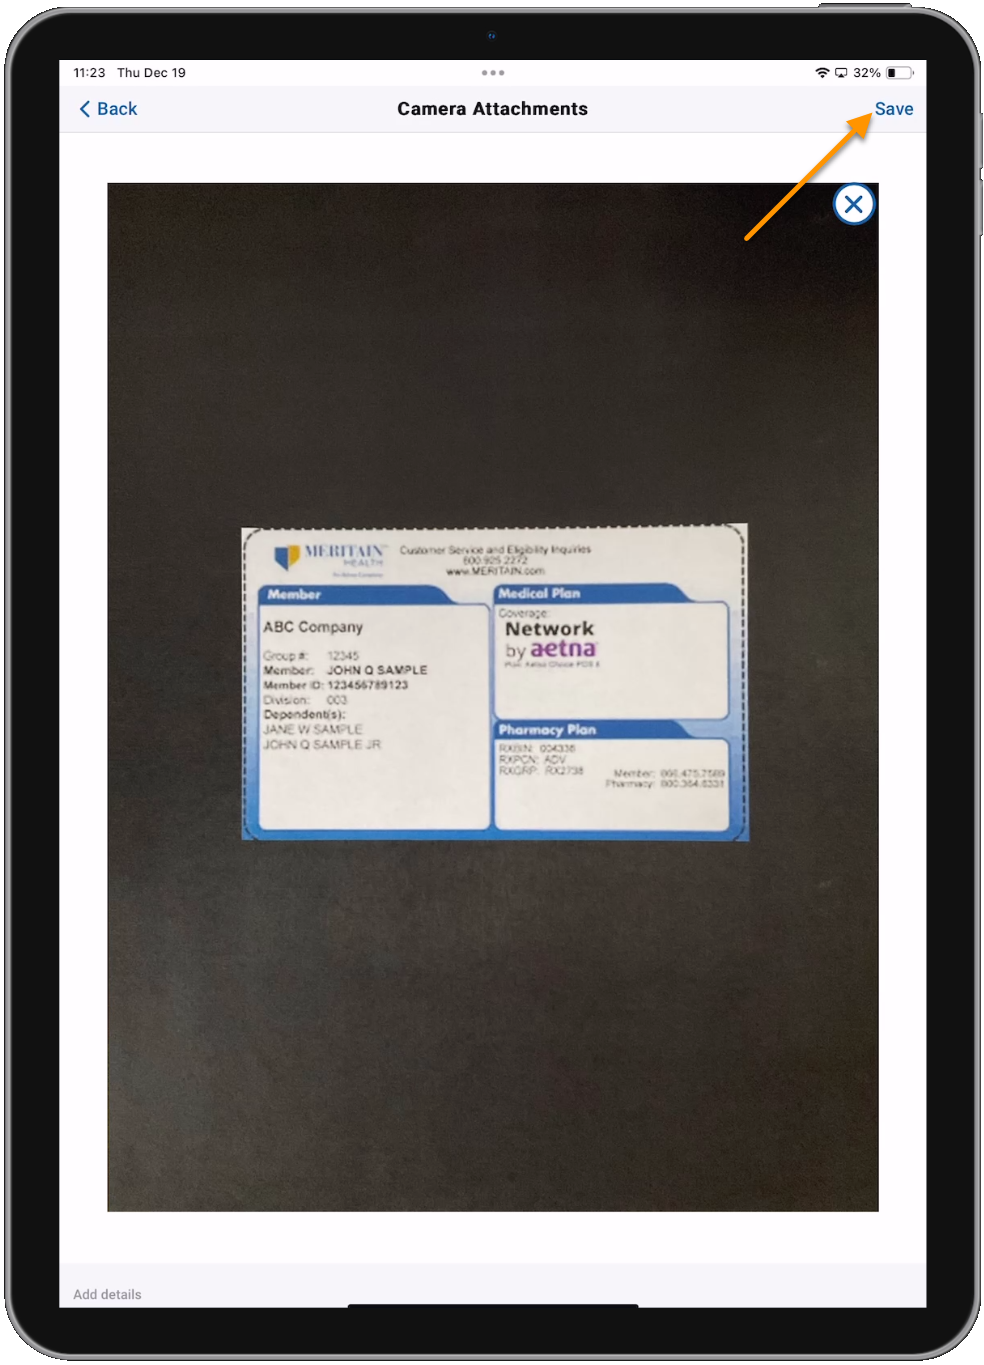
Use the zoom slider on the left to zoom in or out. Tap an area in the image to auto-focus. Tap the circle icon on the right to capture the image. Tap Cancel in the bottom right to close the camera.

-
Tap Retake to discard the image and capture a new one. Tap Use Photo to continue.
-
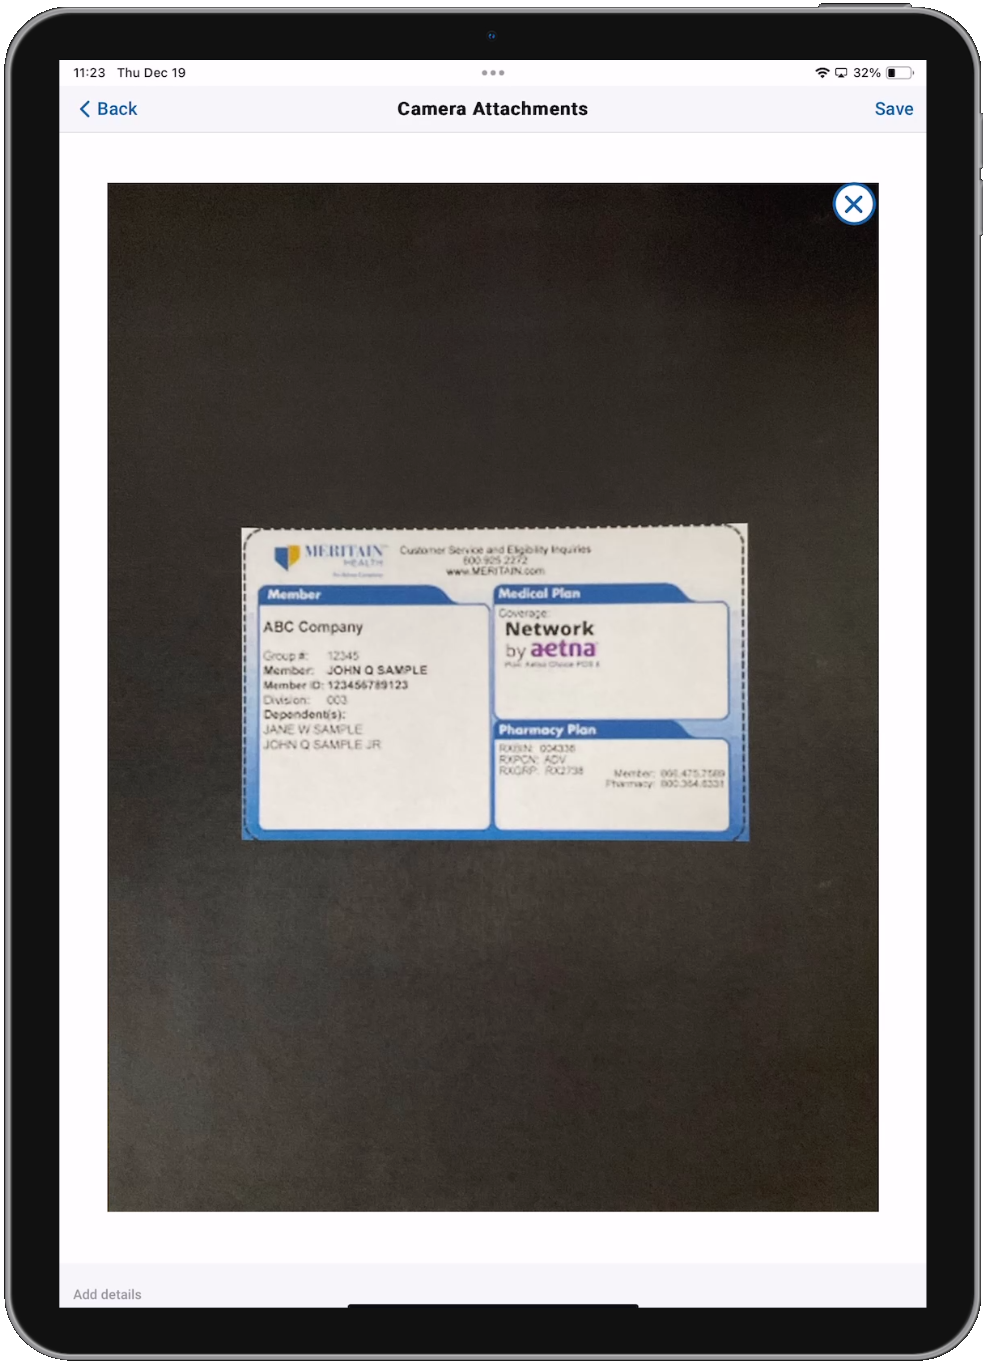
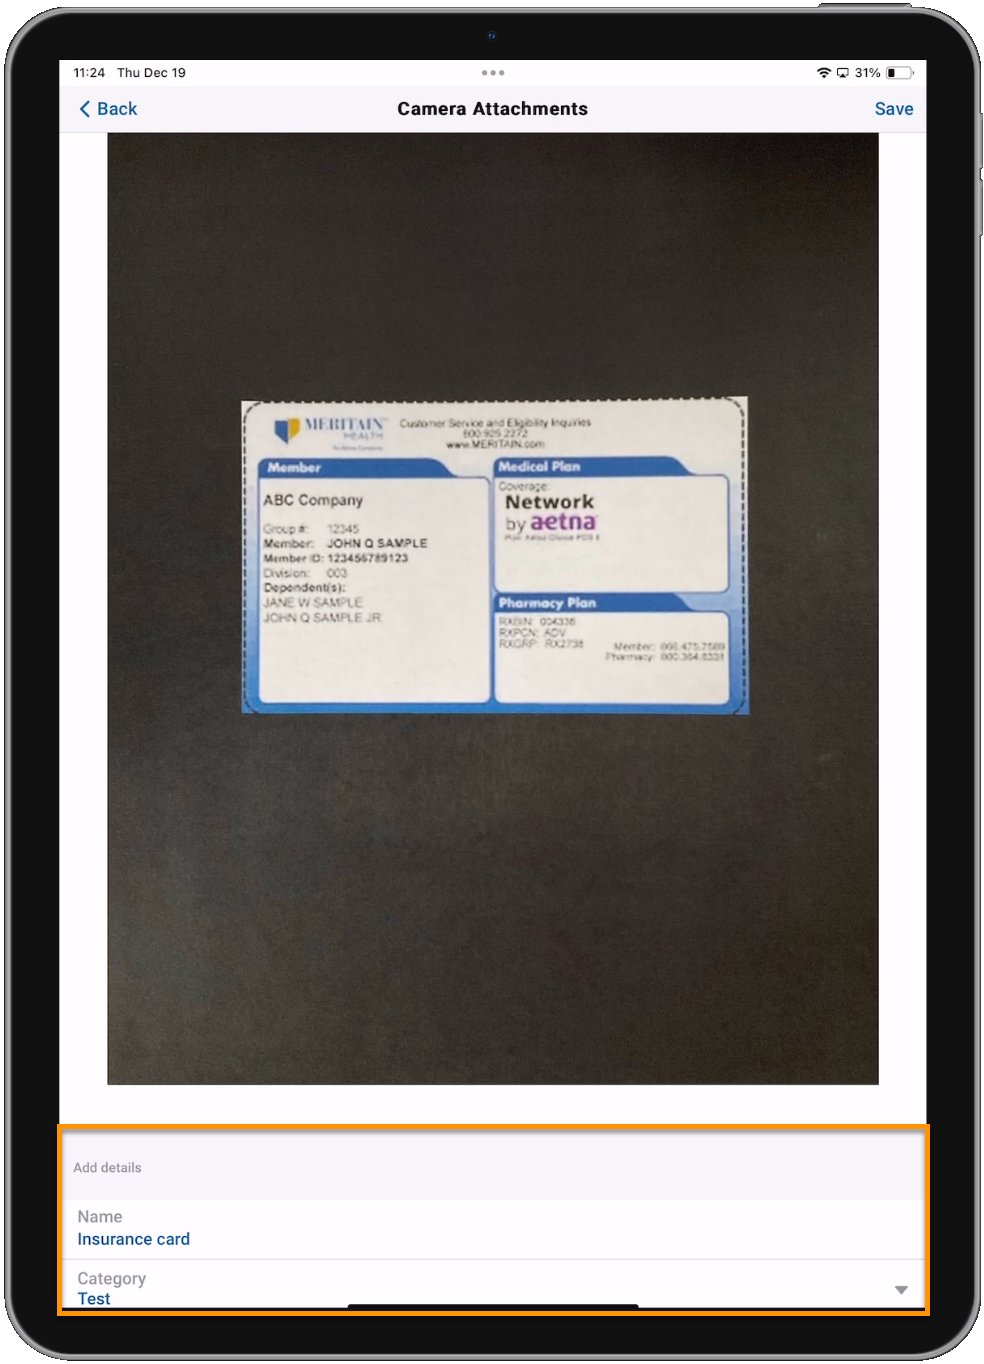
Scroll down to see the Add Details section where you can enter a name for the image and choose an attachment category.
Note: If you do not enter a name for the image, it will be given a generic name (Photo1, Photo2, Photo3, etc.).
-
Tap Save to attach the image to your chart.
-
Tap Display Attachments to view your images and other attachments. Tap Hide to hide them. You can zoom in on your saved camera attachments.
-
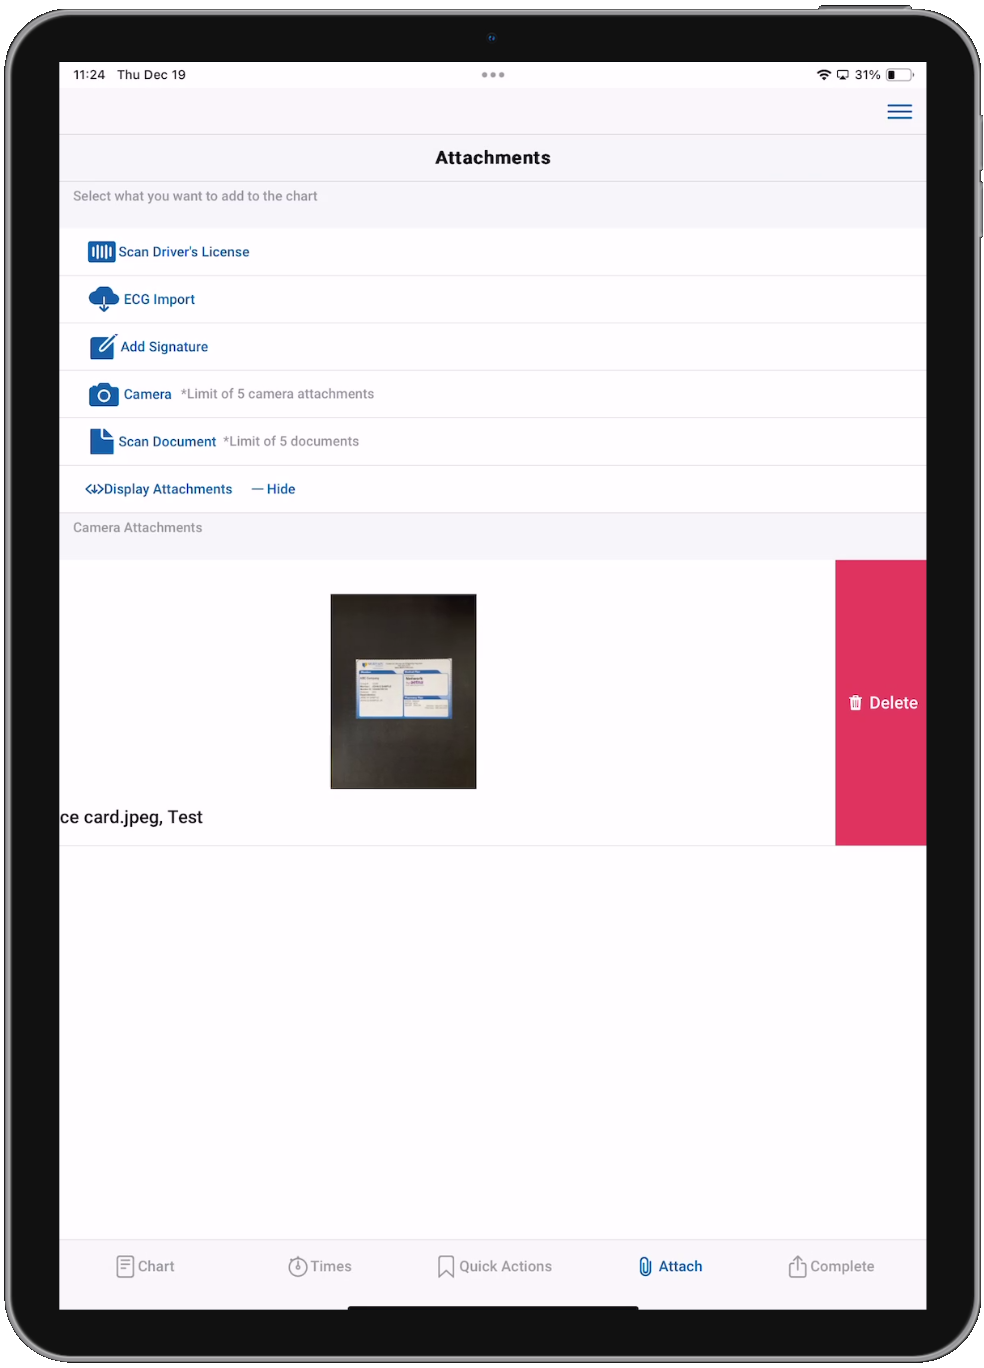
Just like with other attachments, swipe left on the image and tap Delete if you wish to remove them from your chart. They will be permanently deleted.
Scan documents with your device's camera
Scan documents using the rear camera on your device. Documents scanned using this feature are saved directly to the chart as attachments and are not saved to the device's local photo gallery, or anywhere else on the device.
Notes:
-
A maximum of five documents can be attached to a PCR in emsCharts NOW.
-
Document scanning is not currently available in the desktop/laptop version of emsCharts NOW.
-
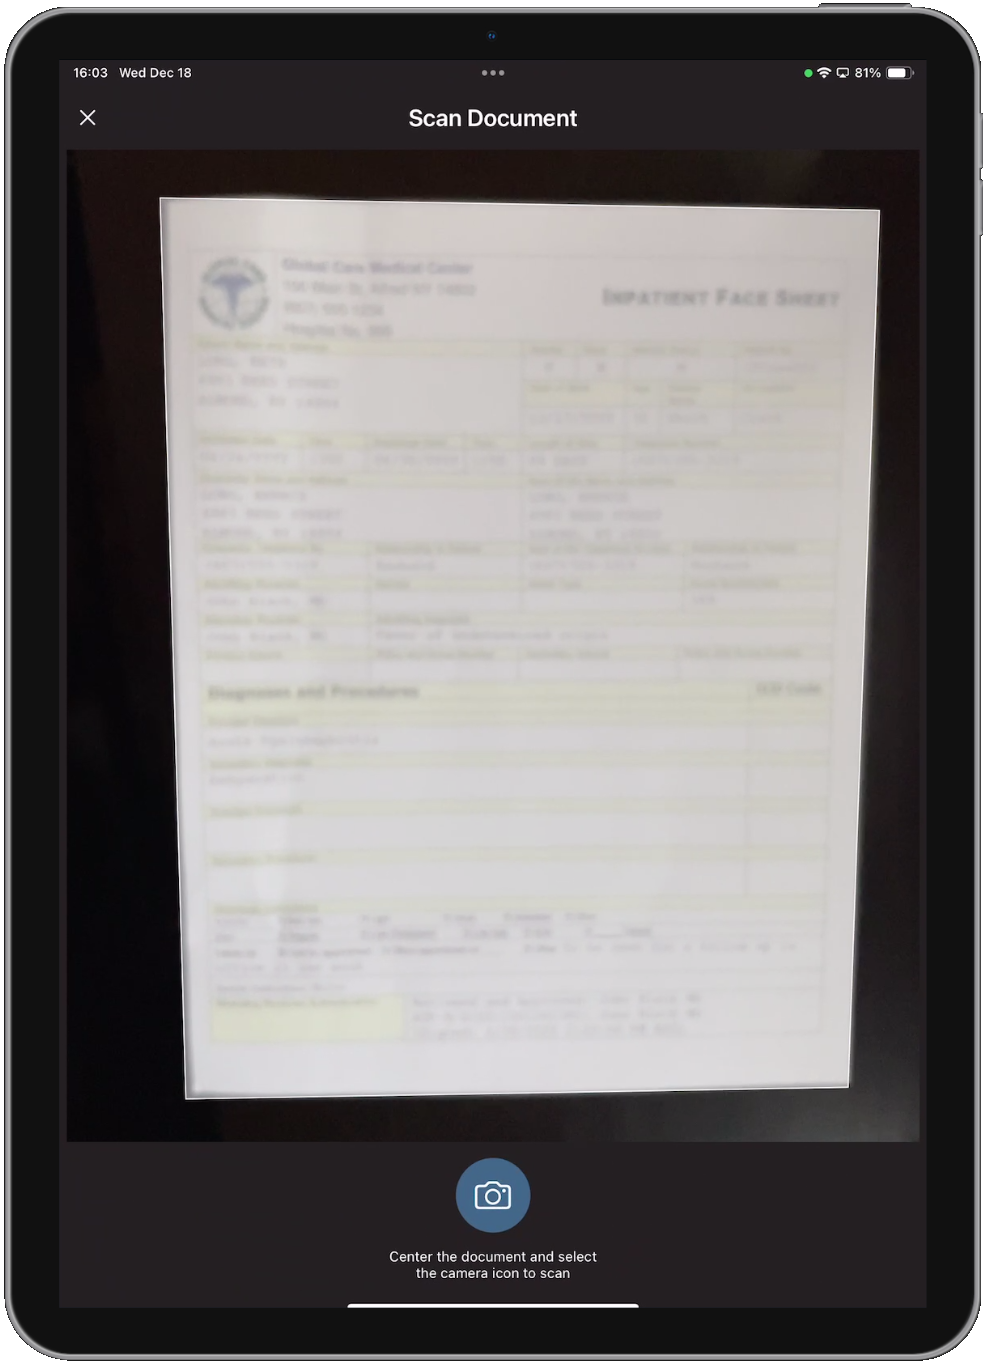
Tap Scan Document to open the document scanner.
-
Center your device over the document to be scanned so the scanning area properly highlights the document. Once the scanner highlights the document, tap the camera icon to scan.
-
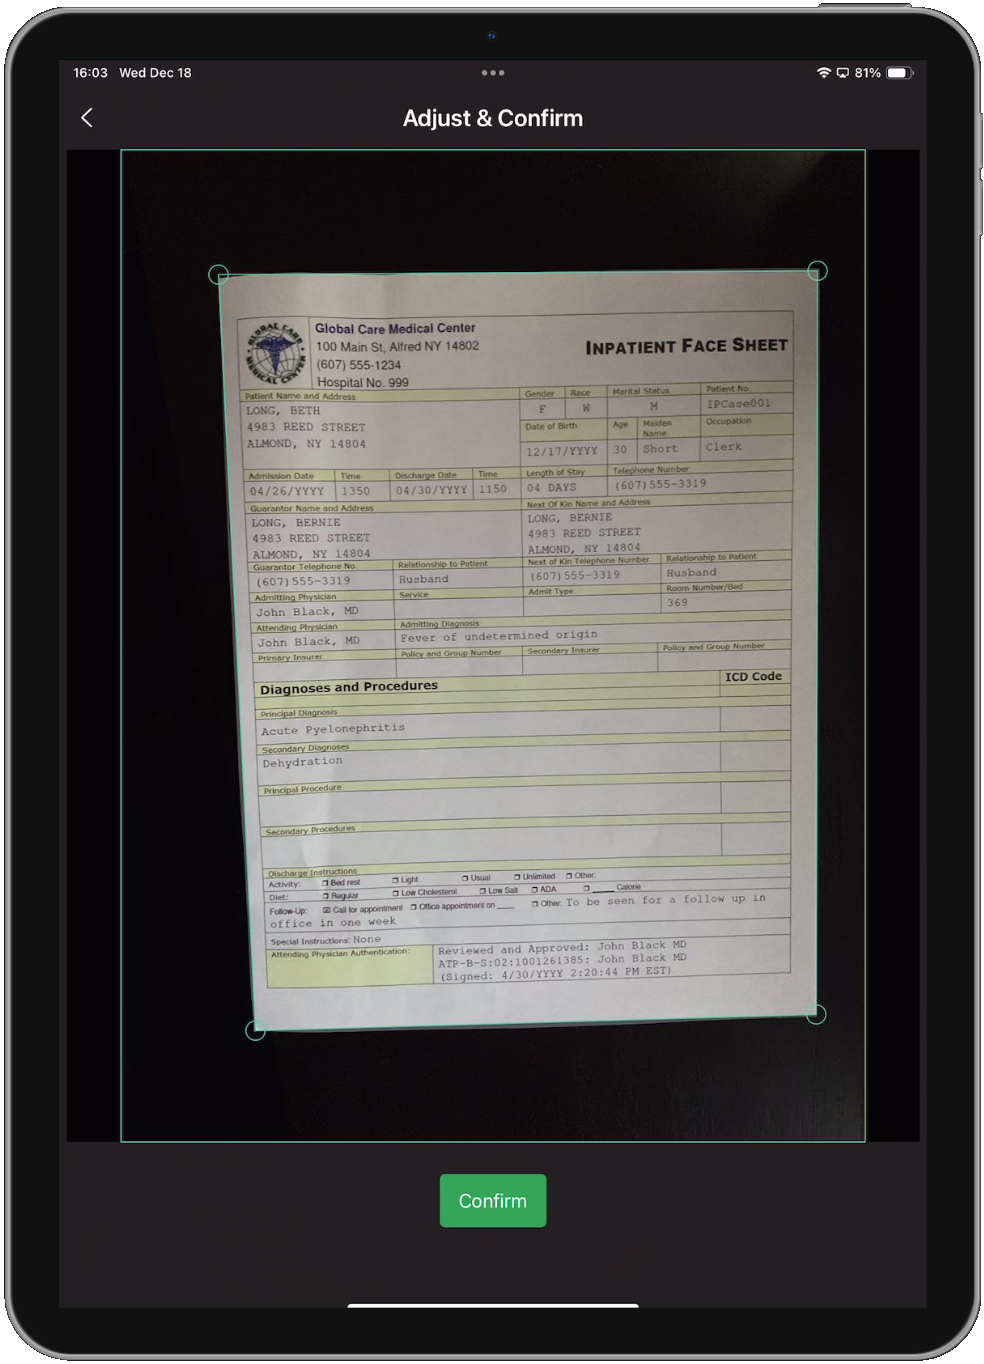
Tap and drag the corners of the border to adjust as needed. When the document is properly outlined, tap confirm to finish adjusting the borders.
-
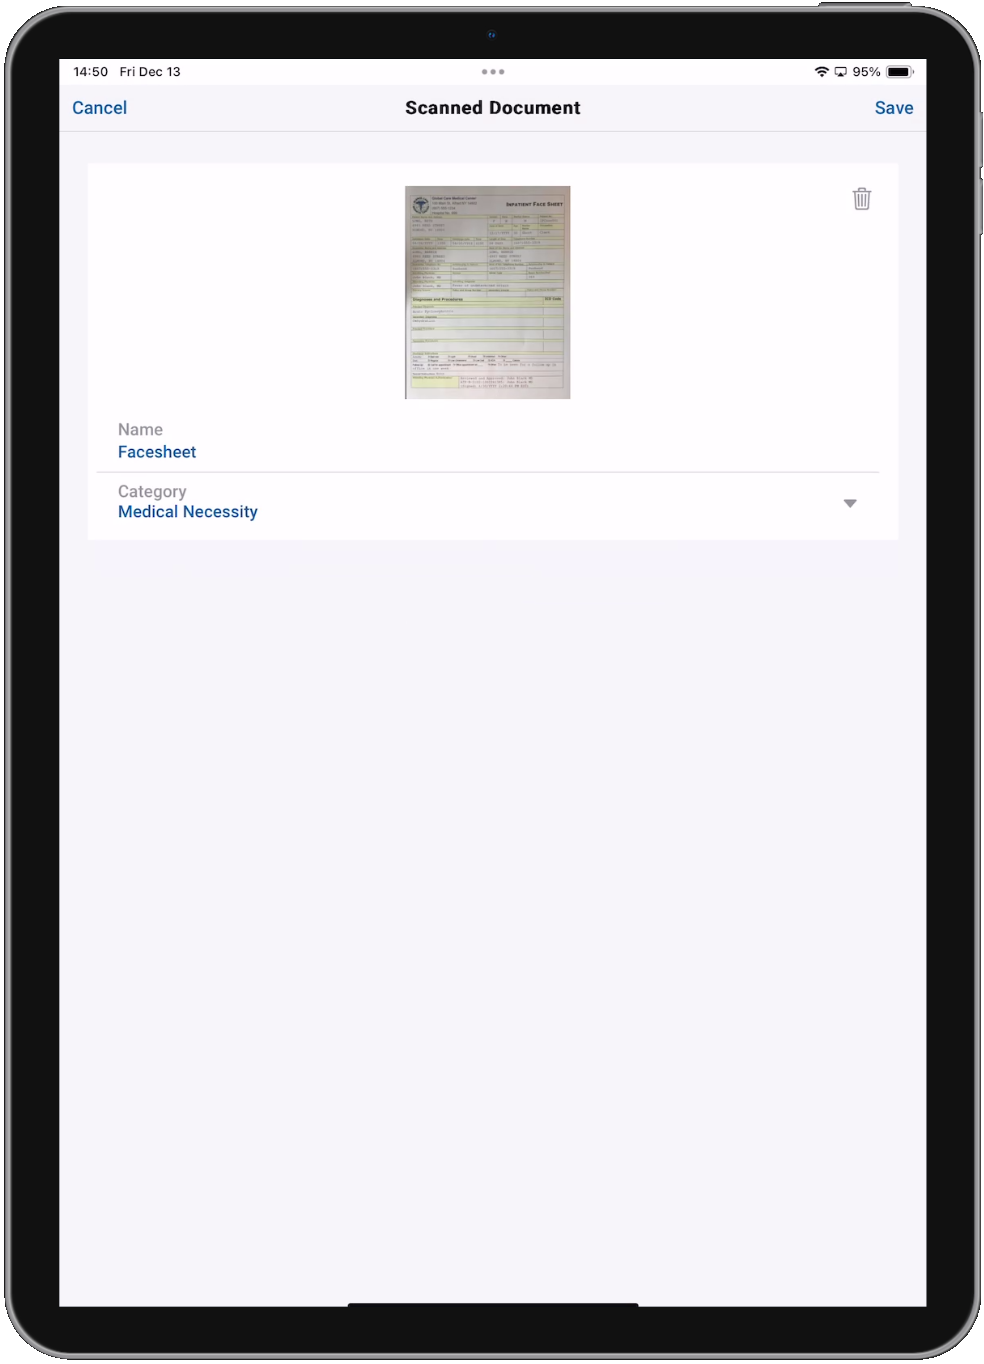
You can type in a name for the document and select an attachment category. Tap Save when finished to attach the scanned document to your PCR.
Note: If you do not enter a name for the scanned document, it will be given a generic name (Document1, Document2, Document3, etc.).
-
Tap Display Attachments to view your documents and other attachments. Tap Hide to hide them. You can zoom in on your saved document attachments.
-
Just like with other attachments, swipe left on the document and tap Delete if you wish to remove them from your chart. They will be permanently deleted.
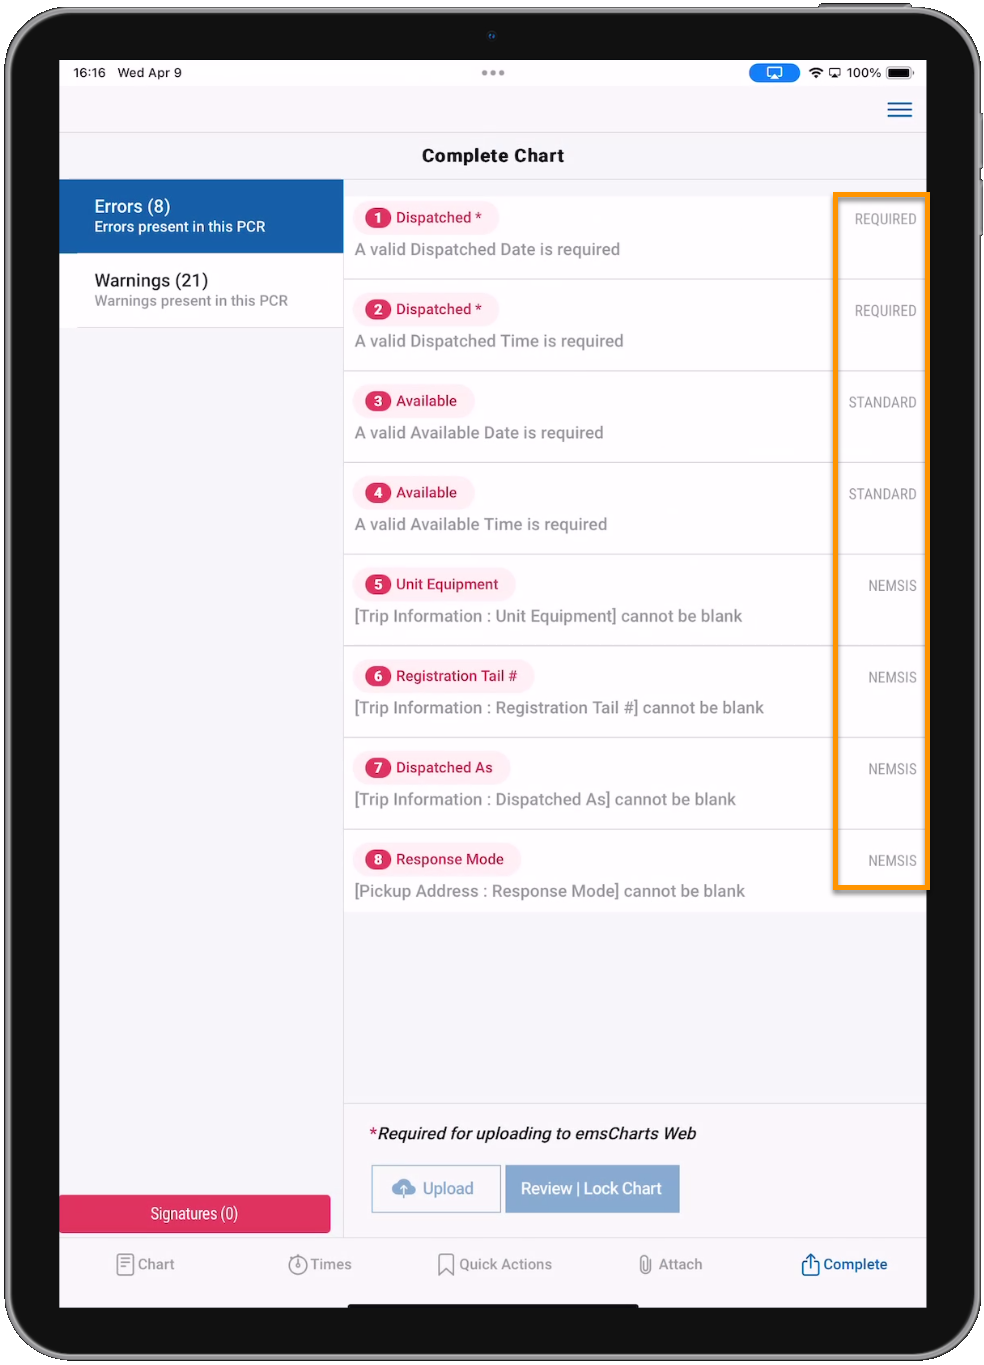
Complete
The Complete page is where you can view any outstanding data validation errors and warnings and either upload your chart to ZOLL emsCharts Web for completion, or lock/complete your chart after satisfying all requirements. Once you complete and/or upload your chart, it will be removed from your device and can only be accessed in emsCharts Web. If you did not lock the chart in emsCharts NOW, once uploaded, you must complete your chart in emsCharts Web. Tap Upload when you are ready to remove it from your device and send it to emsCharts Web for completion, or, if you have satisfied all validation requirements, tap Review | Lock Chart to complete your chart in emsCharts NOW.
Note: When a user logs into the NOW application, any charts existing on that device for more than 12 hours that were created by a different user than the one logging in, will be automatically uploaded to the web.
If there are any outstanding data validation errors or warnings on your chart (including NEMSIS national and state schematrons, as well as Service-defined custom rules), they will be displayed on the Complete page. Each data validation error or warning will have a brief description of the problem and a link to the page or field where it can be corrected. While not every error message will prevent a chart from successfully uploading, they will need to be addressed to complete and lock the chart, so even if you don't complete the chart in emsCharts NOW, correcting any errors in the application means less time spent making corrections later in Web. Some data validations do require correction to upload the chart, for example, a valid Dispatch date/time is required to upload.
There are four categories of data validation errors and warnings. Each error or warning will have one of these four labels listed on the right side of the error/warning:
-
Standard: these are emsCharts NOW formatting rules.
-
Required: these are a subset of Standard emsCharts NOW validations that are required for a chart to be uploaded to the Web.
-
-
Service: these are validation rules defined by the Service.
-
NEMSIS: these are validation rules defined by national NEMSIS schematron.
Notes:
-
You must have an internet connection to upload your chart.
-
If all required NEMSIS and user-defined validation errors have been corrected, you will have the option to sign and lock the chart in the NOW application.
-
NOW version 14.08 supports Service-defined custom rules, NEMSIS national rules, and NEMSIS 3.5 state schematron rules for all states except Idaho and Nebraska. Support for Idaho and Nebraska will be included in a future emsCharts NOW iteration.
-
Until support for all state schematrons and custom rules is implemented, some charts cannot be completed in NOW and must be uploaded to the Web to be completed.
-
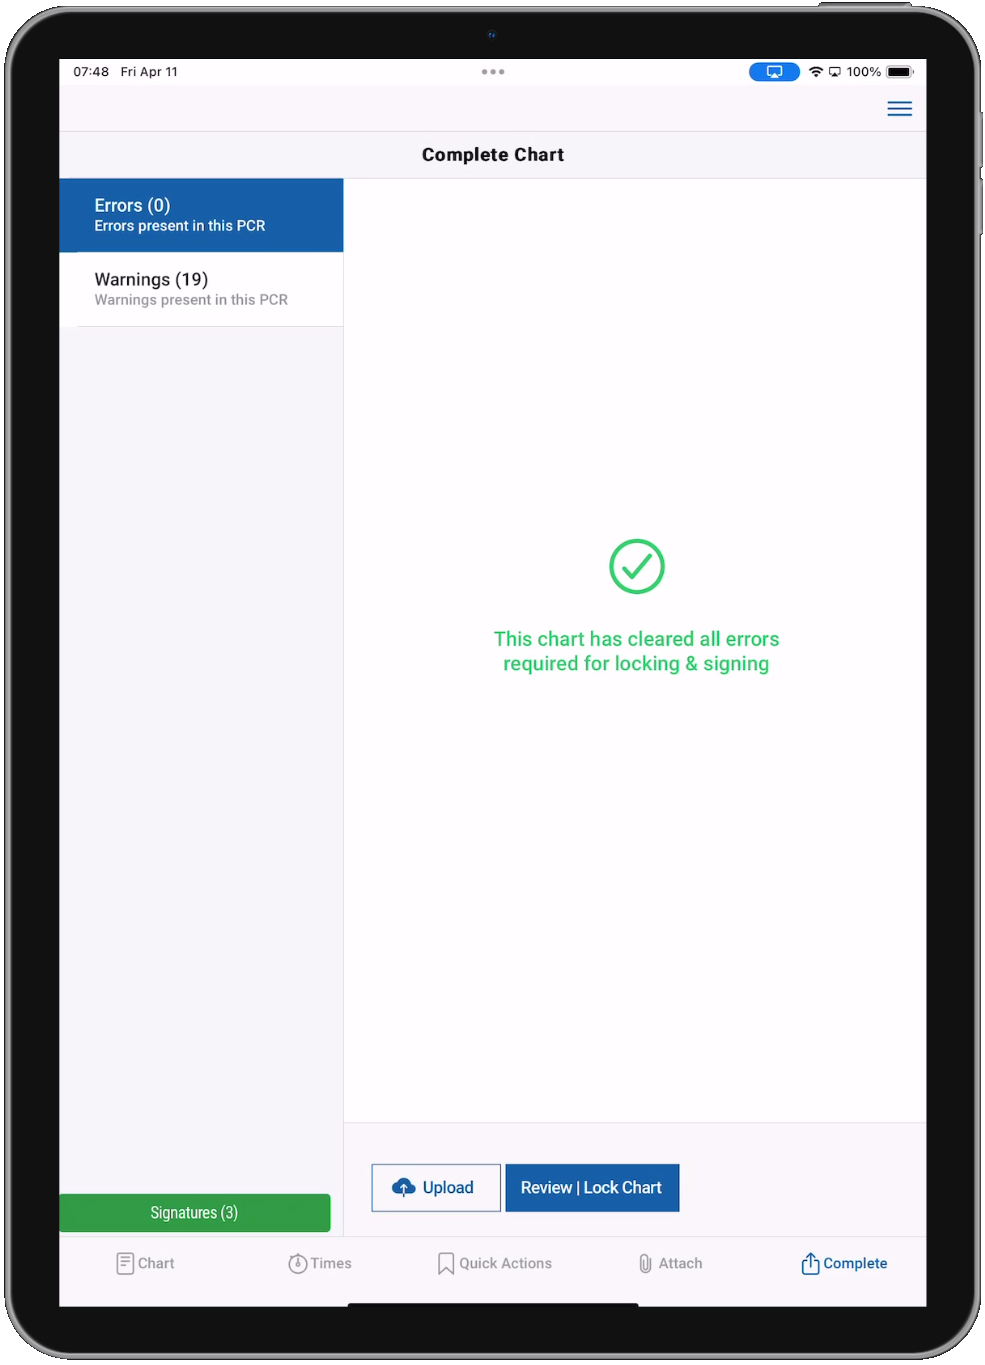
Completing the PCR in emsCharts NOW
-
If you satisfy all data validation errors in emsCharts NOW and the PCR can be completed in the NOW application, you will see a message stating: "This chart has cleared all errors required for locking & signing". Tap Review | Lock Chart to complete the PCR in emsCharts NOW.
Note: If you satisfied all the requirements to complete the PCR in emsCharts NOW but need to upload it and complete it emsCharts Web instead, you can tap Upload to do so. You will be prompted to remove the crew and Complete Chart signatures prior to uploading since those signatures are for locking the PCR. Tap Remove and the crew lock signatures will be deleted so you can proceed with the upload.

-
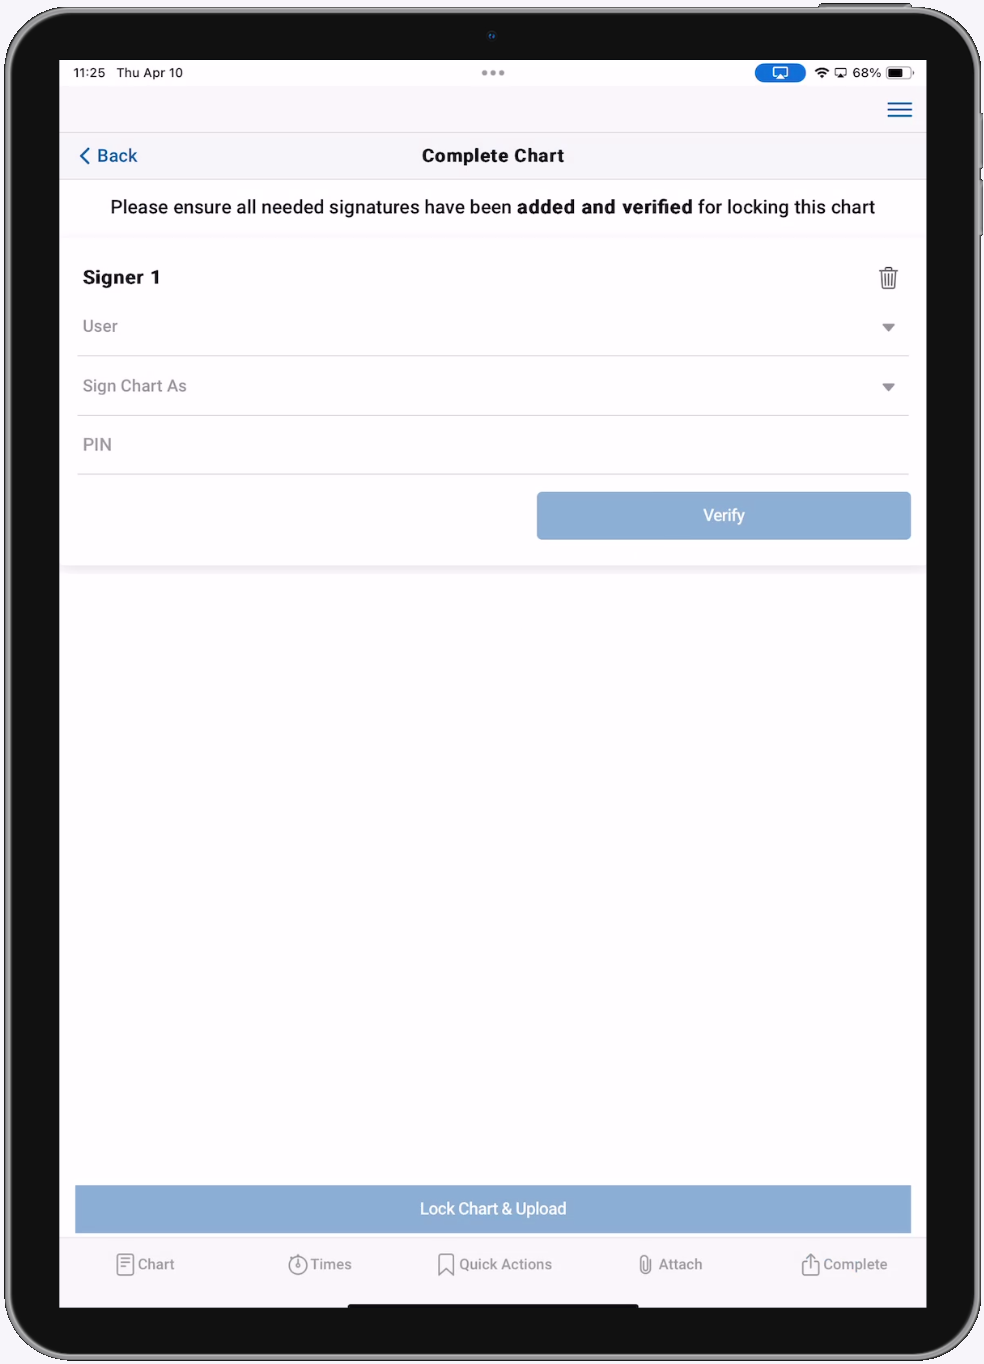
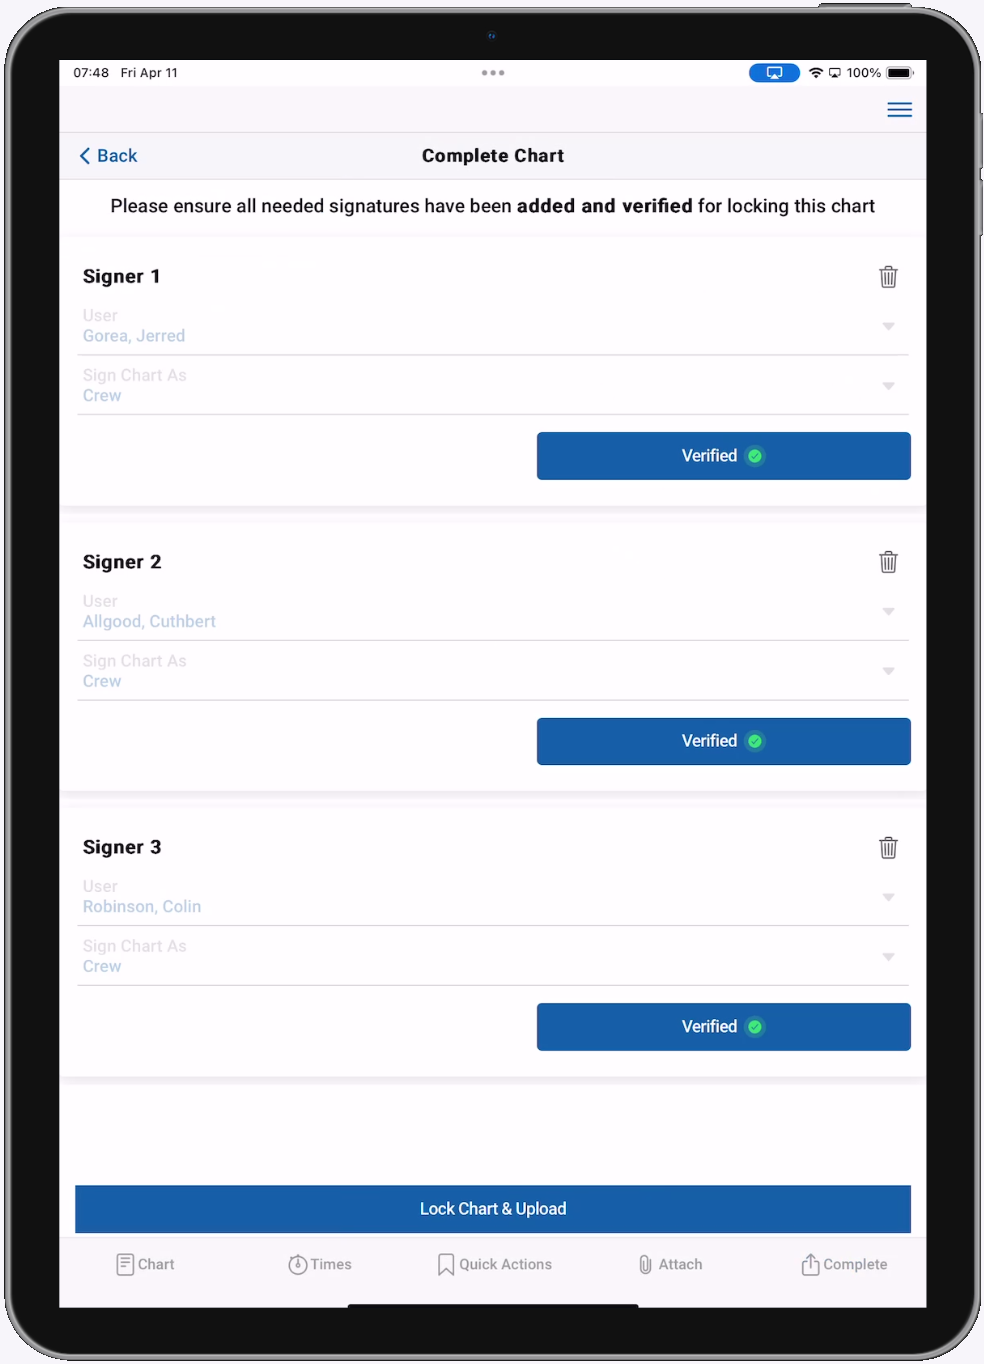
The Complete Chart signatures page will be displayed so you can add all the required crew signatures if you have not done so already. Each crew member signing must enter their PIN and tap Verify to add their signature to the PCR. Once all the signatures are verified, tap Lock Chart & Upload to finish uploading the completed PCR to Web.
-
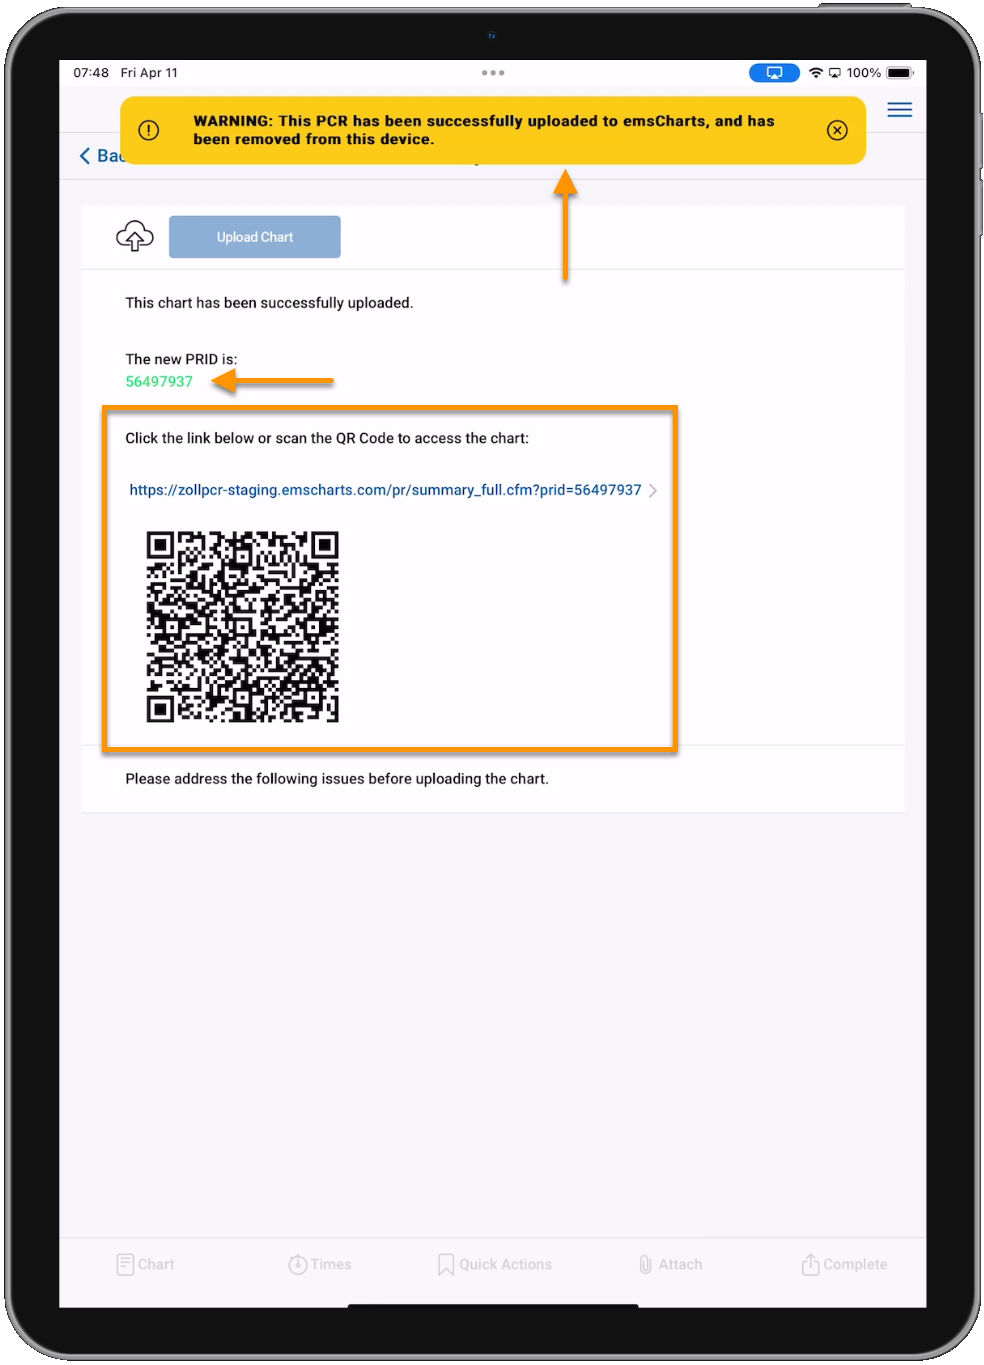
Once your chart has uploaded successfully, you will see a message at the top of your screen indicating it has been removed from the device. You will also see the PRID assigned to your chart upon upload and you will be presented with a link and a QR code, both will take you to the chart in emsCharts Web.
PCRs that can't be completed in emsCharts NOW
-
If the chart cannot be completed in the NOW application, you will see a message stating: "This chart requires completion in web. Please upload the chart". Tap Upload to upload the PCR to emsCharts Web.

-
Once your chart has uploaded successfully, you will see a message at the top of your screen indicating it has been removed from the device. You will also see the PRID assigned to your chart upon upload and you will be presented with a link and a QR code, both will take you to the chart in emsCharts Web where you can complete the PCR.
Go back to the Patient Care Report landing page.