Setting up CAD Elements to ZOLL emsCharts Mapping
It probably has been sometime since Onboarding worked with you to map your CAD system to ZOLL emsCharts. If you need to make changes or additions, this information will help you get reacquainted with setting up the CAD elements. Once setup, you can continue on to mapping the elements.
We have a video that covers the mapping setup. You can start with the video or read on (the following content covers the same material as the video).
Security roles
Before you can map elements, you must have the correct security role. These roles are set in the Security Roles code tables. To get there, click Configuration > Service and then click the Code Tables tab. In the search bar, type Security Roles.
Any of your CAD or software administrators should have some, if not all of the elements enabled under the 'Patient Record - CAD Import' heading. Let's look at what each element does:
- Import CAD data into chart: This security setting should be enabled for crew members after the setup is complete and you are ready to roll out the CAD import to all of your members. It allows the 'Import' button to display on page one of the patient record.
- Modify CAD mappings: Allows you to change, add, delete, CAD mappings.
- Dynamically map code tables and hospital codes: Enables users to map hospitals and any other mappable fields directly from the chart itself.
- Dispatch ID read only override: Allows users to override the locking of the dispatch ID.
The following video explains each of these settings in more detail.
emsCharts CAD Import code table
If you have the required settings for your role, go back to the code table search field and type 'emsCharts CAD Import'.

CAD system: Select the primary CAD system you are configuring the import for.
Days to show in import list: This is the number of days of importable trips that users see on page one when they click the import button.
Hours to show in mobile/tablet import list: This setting only works on the mobile version of ZOLL emsCharts. It works like the 'Days to show in import list' setting.
Filter by unit: Dictates if trips that appear on page one should be filtered by the unit selected when users are setting up their crew. Select 'Yes' to filter the list to only the trips for the selected unit. Select 'No' to show all trips based on the time related settings.
Uniqueness: Tells the system if each unit responding to an incident will receive its own unique ID number or if all vehicles share the same ID. Configure this setting based on how your CAD handles ID numbers for a multi-vehicle situation.
Require Dispatch ID to Import: Select 'Yes' to require the crew to enter a Dispatch ID to pull up the list of trips that can be imported. Select 'No' to allow the crew to display the list of all available trips.
Click Save.
Chart tab
There a are a couple of settings you will need to configure for data mapping on the Chart tab.
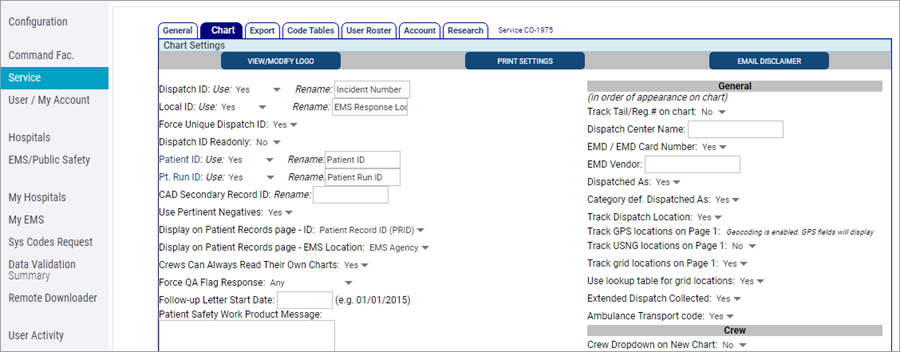
Dispatch ID: In order enable the import functionality, this setting must be set to 'Yes' or 'Required'. If set to 'Yes', the functionality will be enabled. If set to 'Required' the field must be populated prior to completing the charts regardless if an ID is imported or not. The 'Rename' field allows you to modify the display name of the field on-screen.
Dispatch ID Read-Only: Set this to 'Yes' to block the crew from modifying the dispatch ID that’s populated by the CAD import. Set it to 'No' to import the value but allow the crew to modify it.
CAD Mapping
CAD import data options
Although the CAD import data options probably will not change, we wanted you to know where this information is located and how to modify it.
In Configuration, click CAD Mapping and then click 'CAD Import Data Options'.
The page displays a list of data points that you can import from the CAD system. None are selected by default. This means that all the displayed elements can be imported. To stop the import of an item, check the box and then save your changes.

Dispatch notes
Another setting on the CAD Data Import Options page is Dispatch Notes.
For the highlighted data points you have three options for Dispatch Notes:
- Default import into Page 8: Brings in all notes that contain a time stamp.
- Default, not imported: Bring notes into the HPI section.
- Not imported – disable: Disables the import of all dispatch notes.
Once you’ve modified your settings click Save.