Sharing PCR Data
The ZOLL emsCharts Share PCR feature allows Services to easily share information that has been documented for an incident in one PCR, to another PCR that has been created for the same incident. PCR data can be shared between units within the same Service, or with units responding to the same incident from other Services also using ZOLL emsCharts.
The Share PCR feature is available to units within the same Service without any additional configuration. Services can share PCR data with other ZOLL emsCharts Services that they have explicitly requested to share data with, and the other Services have explicitly accepted the request to allow data sharing. Work with your Service Administrator if you need to share PCR data with another Service (or import data from another Service) and are unable to do so.
Learn how to configure your Service to share PCR data with other ZOLL emsCharts Services.
How to use Share PCR
Share PCR is a one-time import of information from one PCR to another. After data from PCR-A has been imported into PCR-B, changes or additions made in PCR-A will not be reflected in PCR-B. It is imported to coordinate with the crew that you are importing data from to ensure that sufficient information has been documented in their PCR prior to using the Share PCR import. Once you import data into a chart, you will not be able to import data from another PCR into that same chart, but other charts can still import the data from the original chart you imported data from.

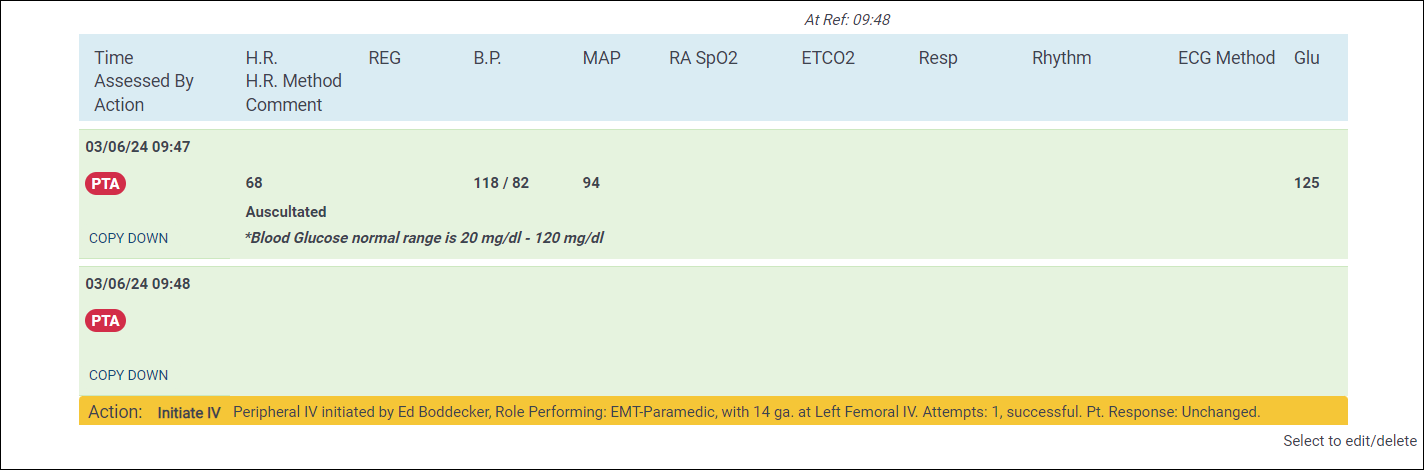
Vital Signs and Procedure information that is imported using Share PCR will be displayed on the receiving PCR as having been obtained or performed Prior to Arrival (PTA).
Patient demographic information that is imported using Share PCR is fully editable on the chart importing the data. Specific configurations are needed for Patient Medical History data to import using Share PCR. Please work with your Service Administrator if you need Patient Medical History data to import but it is not.
Watch this video that walks through using Share PCR to import data into a chart.
-
Both PCRs must have the Referring / Scene address and unit arrived On Scene date/time documented.
Notes:
-
The Referring / Scene address must be exactly the same on both charts, including the +4 of the Zip Code if used.
-
There cannot be more than a two hour difference between the On Scene date/time documented on the charts.
-
-
Once both PCRs meet the Share PCR matching criteria, you will see a handshake icon and numeric indicator displayed in the header of the PCR. The numeric indicator is the number of potential PCR matches.

-
Click the handshake icon to open the Share PCR Actions window. You will see a list of all the PCRs that meet the matching criteria.
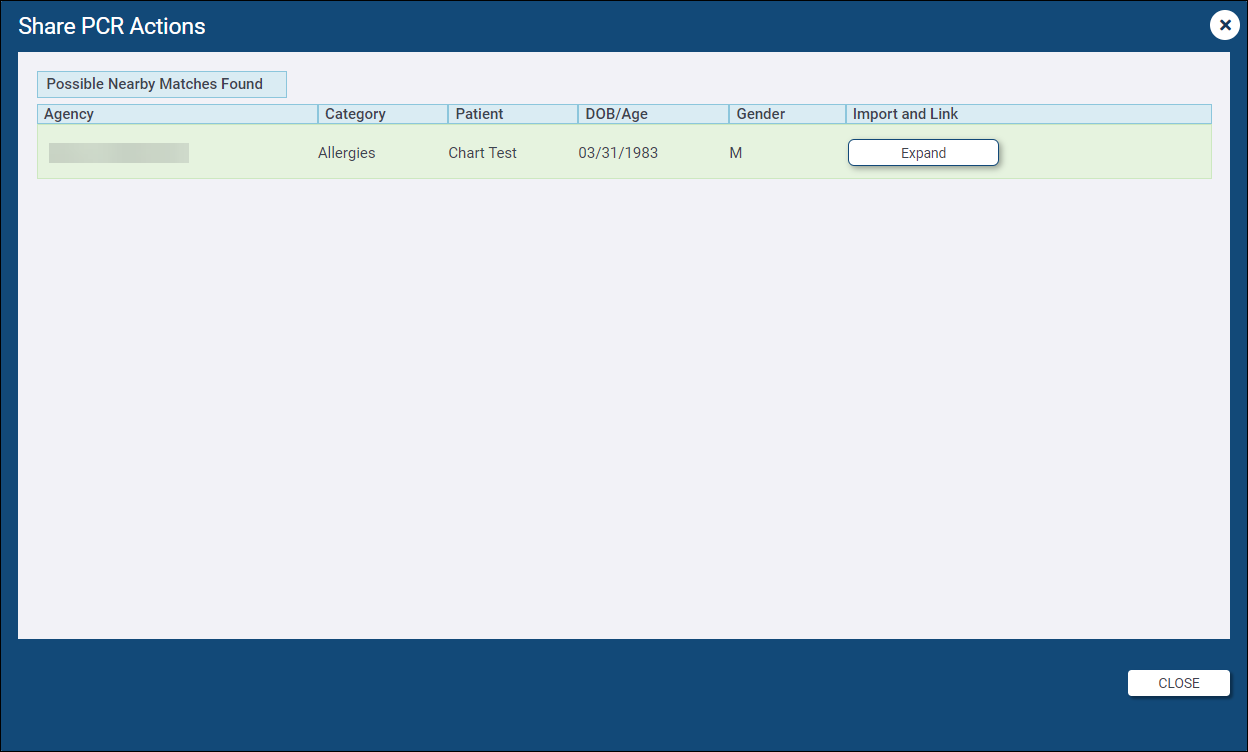
-
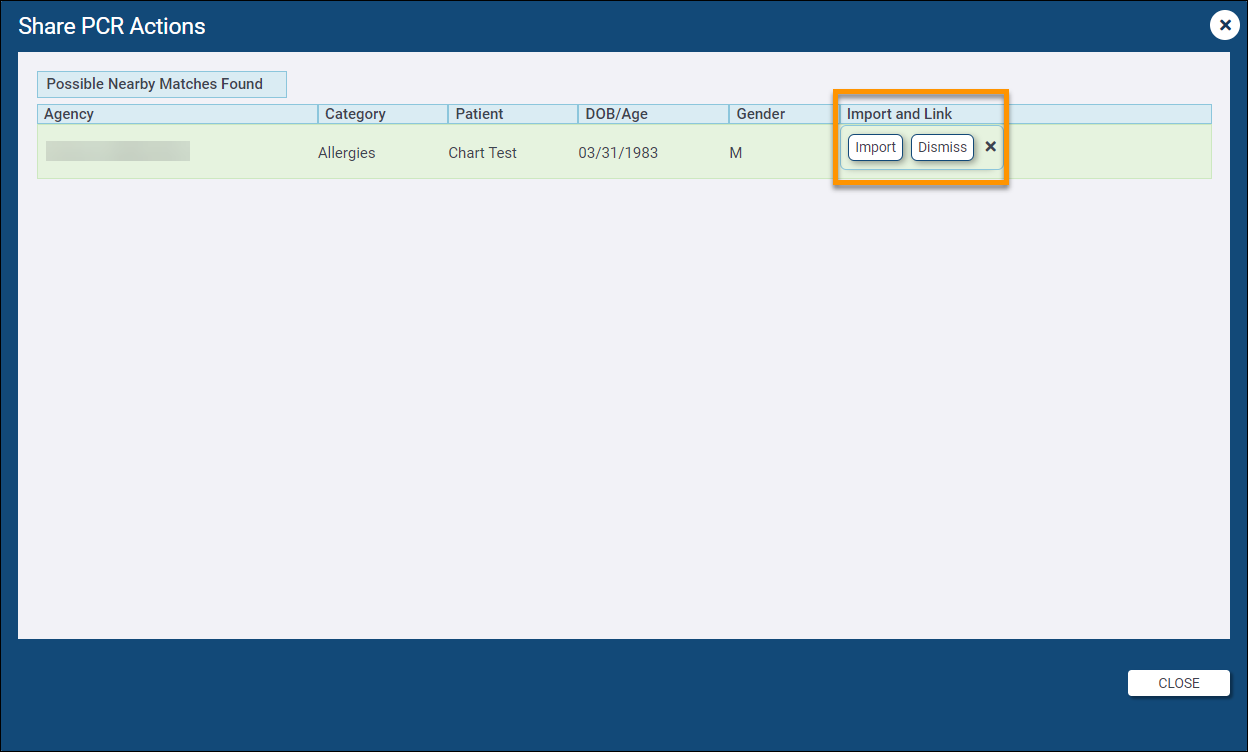
Click Expand to either import data from that chart, or dismiss that chart from the Share PCR list.
Note: Clicking Dismiss will display a warning stating "Removing this record will permanently remove it as an option FOR THIS CHART." If you click Cancel on the warning, the chart will remain in the list available to import PCR data. If you click OK on the warning, the chart will be removed from the Share PCR Actions list and will not be available to import data from into the chart you are working on.
-
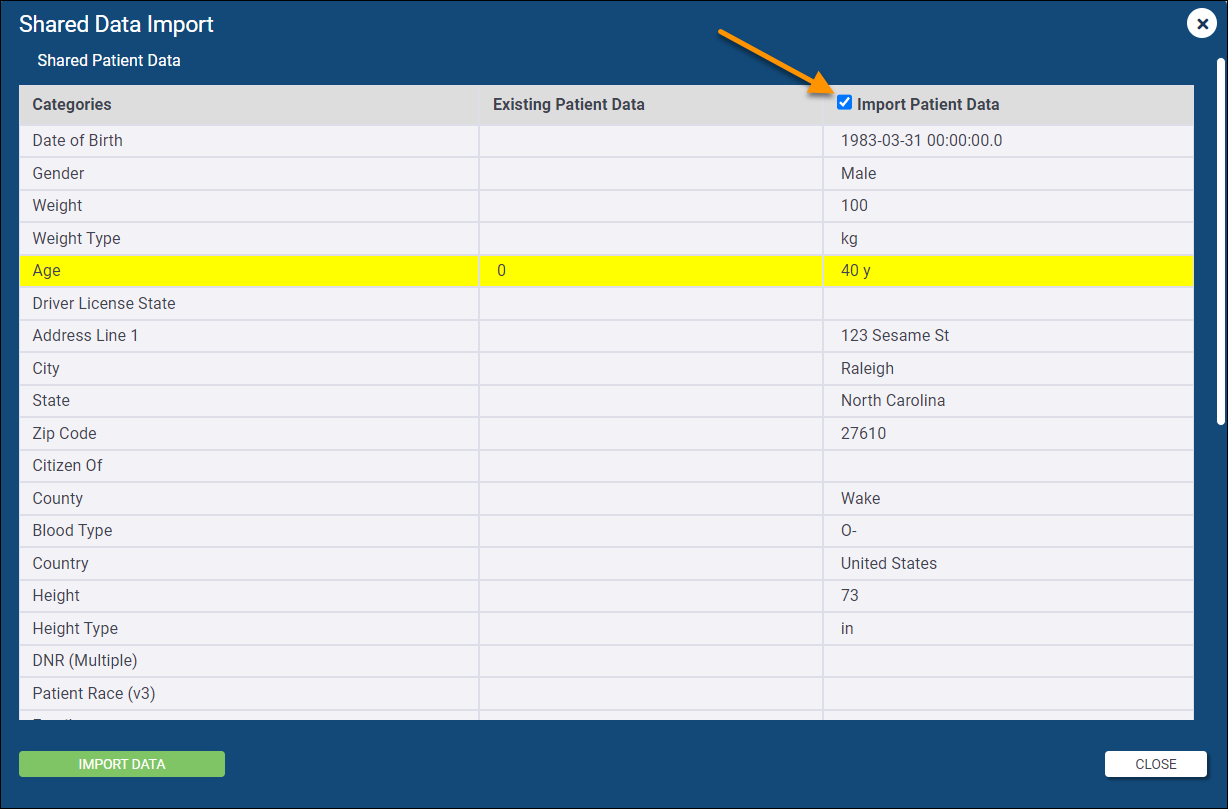
Clicking Import will open the Shared Data Import window. You can then see all the patient demographic information documented on the chart you are working on compared to the information documented on the chart you are importing from. If you scroll down, you will also see the Actions documented on the chart you are importing from. Click Cancel if you need to go back to the Share PCR selection list.
-
If you want to import the patient information, check the 'Import Patient Data' box in the top right, and then click IMPORT DATA.
Important! Importing the patient data displayed in the Shared Data Import window will overwrite any information documented in those fields on your chart.
-
Scroll down to see the Actions documented on the chart you are importing from and select which ones you want to import.
Note: Any imported Actions will be marked as PTA on your chart.

-
When you are finished with your selections, click IMPORT DATA to finish the import. This is not reversible but any imported data can be edited or deleted from your chart.
-
-
Once the import is complete, you will see any imported patient demographic information on the Patient page and any imported Actions will be displayed as PTA in the Activity Log on Page 8.
F.A.Q.
Some common questions.
Question: What happens if I dismiss a chart from the Share PCR Actions window?
Answer: That chart is no longer available to import data from into the chart you are currently working on. Other charts that meet the criteria will still have the option to import data from that chart.
Question: Is there a way to revert back to my original chart data after using Share PCR to import data from another chart?
Answer: There is not currently a way for you to "undo" or revert a Share PCR import. Once Share PCR has been used on a chart, it cannot be used again. You can, however, remove imported patient demographic information by using the 'Replace Patient' button on the Patient page; this will remove all patient information from the chart and require you to add a new patient. Vital Signs and Procedure information that was imported via Share PCR will need to be manually deleted to remove them from the PCR.
Question: What happens if there is a conflict in picklist data between my Service and the Service I am importing from?
Answer: During the import, Share PCR checks to see if all the imported picklist data exists in the receiving Service's Code Tables, and if it does not, the system writes it to the applicable Code Table for the receiving Service and marks it as "Hidden". This allows the information to be imported and continue to be referenced by the system when that chart is accessed in the future (so the information appears in the chart as normal), but does not allow crews to see or select those options in the list when documenting other charts for that Service.
Question: What happens if I import Vital Signs or medical device data that was captured on the original chart using ZOLL Cloud ECG?
Answer: The data will be imported and displayed on your chart as if you had captured it manually.
Question: When will I see that there are potential matches for Share PCR import?
Answer: As soon as the Referring / Scene address of two or more PCRs matches exactly, and the On Scene date/time of those PCRs is within two hours.
Question: What happens if the Service I am importing PCR data from makes a change after I have imported the data?
Answer: The Service would need to communicate to you that they have made a change so you can document any applicable changes on your chart.
Question: What happens if I use the 'Replace Patient' option to update the patient information after I have already used Share PCR to import patient data?
Answer: Since the Share PCR import is a one-time process that cannot be reverted, you would need to manually correct any patient information that was accidentally updated after the Share PCR import.
Question: Does the Service I am importing from receive a notification of what Service or unit imported their data?
Answer: The Service sharing PCR data with you does not receive any notification at this time that you have imported data from them.
Question: Do both charts have to be open?
Answer: No, the system will still find matches on locked charts.