Auto-Tag
When auto-tag is enabled, the system automatically applies the tag name to newly uploaded cases that matches the search. The system will not apply the tag to cases that were uploaded prior to the time you started using auto-tag.
Auto-tag is available for Device Versions and Return of Spontaneous Compressions (ROSC) that were edited and saved in the case.
Notes:
-
You do not need to add the ‘v’ (which stands for ‘version’) in front of the device version for auto-tag. CaseReview has logic to ignore the ‘v’ for searching and auto-tag.
-
For ROSC cases, they are not uploaded into CaseReview with ROSC auto-identified. ROSC is a condition that must be manually edited and then saved. Once, the case is saved with ROSC, the case can now be auto-tagged for future searches.
To enable auto-tag on a saved search (Admin only):
- On the
- Select the saved search from the list.
-
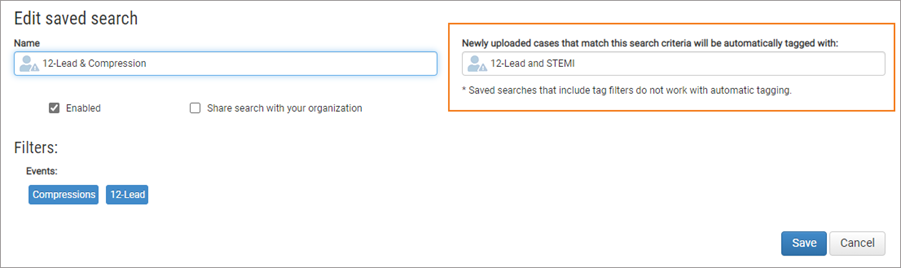
In the "Newly uploaded cases that match this search criteria will be automatically tagged with" field, the saved search name will be auto populated. You must click Save to enable auto-tag.
If you are editing the saved search and you do not want this search to be used for auto-tag, remove the search name from the "Newly uploaded cases that match this search criteria will be automatically tagged with" field and then click Save.
Note: Generally, CaseReview uses the 'AND' logical operator to auto-tag new uploaded cases that contain the saved search criteria. For a small number of criteria, CaseReview uses the 'OR' operator. For example, if the saved search contains adult and children, audio and no audio, AED and R Series, CaseReview would match and auto-tag cases that contain either of those criteria.
Tag Cases with Multiple Tags
Automatically apply tags to uploaded cases that match saved search criteria by creating multiple saved searches. Use this feature to identify cases that meet a specific saved search across multiple teams. For example, if you want to find cases with 12-Leads from two groups, create a saved search with a filter criterion of 12-Lead and save it twice—each time with a name reflecting the respective group.
How to create multiple tags
-
-
On the "Save this search" window, enter the name of the search, and click Save.
- Because this search will be used for multiple tags, enter any number of new names in the "Name of search" field, clicking Save each time.
- Click View All next to 'Search Searches' under Custom Filters.
- Find the name of the saved search and click Edit.
- In the "Newly uploaded cases that match this search criteria will be automatically tagged with" field, enter the group's name.
- Click Save.
- Continue with steps 5 - 7 until you have entered tag names for all your saved searches.
Example
The following example demonstrates how to create three tags: Division, Battalion, and Station. The system automatically applies these tags to cases uploaded from an X-Series device with a specific device ID.
- First create a search for cases with a specific device ID.
-
When the search results appear, select Save this search and enter a name – for example: “Device ID 1 - Division 12."
The objective is to apply three different tags to the same device ID, so use the same search to add two more tags with different names.
Example:
- Click Save this search, name the second search “Device ID 1 - Battalion 1” and then click Save.
- Click Save this search, name the third search “Device ID 1 - Station 14” and then click Save.
-
- To tag cases with Division 12, enter Division 12 in the "Newly uploaded cases that match this search criteria will be automatically tagged with" field and then click Save.
- Find the “Battalion 1” search in the saved searches list and click Edit . To tag cases with Battalion 1, enter Battalion 1 in the "Newly uploaded cases that match this search criteria will be automatically tagged with" field and then click Save.
- Find the Station 14 search in the saved searches list and then click Edit . To tag cases with Station 14, enter Station 14 in the "Newly uploaded cases that match this search criteria will be automatically tagged with" field and then click Save.
- Click Upload on the navigation bar and upload case files from this device.
- Click Detail on the Upload page and look at the tags section. The system will automatically apply the tags to the uploaded cases.
To create automatic tags for a different device, repeat steps 1 - 10 with a new Device ID. You can give this new device the same tags or modify them depending on your needs. For example, you can use the same Division and Battalion name but a different Station for the cases uploaded from this second device.