Incomplete Workflow on the Dashboard
Incomplete claims
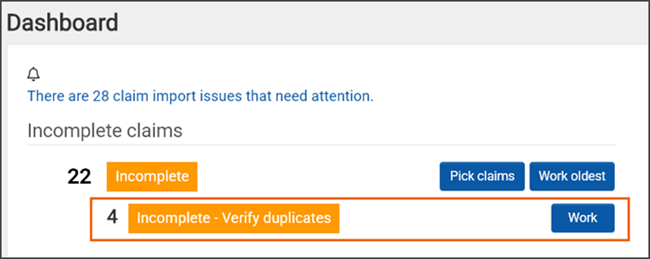
There are several ways to bring claims into ZOLL Billing; import a NEMSIS file, import PCRs through the Billing API, or manually create a claim. The Dashboard will let you know how many unassigned incomplete claims there are in the system. If you see a zero amount accompanied by a happy face, you can relax. If you see a number accompanied by a Work button, it's time to get those incomplete claims done.
Imported claims are assigned a status of incomplete with a status reason of:
-
Incomplete - Verify duplicates: If the claim displays in this area it means that some aspects of the patient demographic information in the imported claim matches existing records. You do not work the claims in this section, only verify the patient information.
The number shown for 'Incomplete - Verify duplicates' is a subset of the "Incomplete" total. For example, you might have eight incomplete claims, four of which need patient verification.
Or you might see eight Incomplete claims where all eight need patient verification. In this case, note the following:
-
Click the Work button next to Incomplete - Verify duplicates and verify the patient accounts first.
-
Clicking the Pick claims button next to Incomplete will not work until the claim(s) are verified.
-
-
Incomplete: If the claim displays in this area it means that the demographics of the imported claim did not exist in the system at the time of the import. There are a couple of ways to work unassigned, incomplete new claims:
-
Work oldest: If you want to work new claims by the oldest date of service, click Work oldest. The system will serve up the first incomplete, unassigned claim with the oldest date of service. When you are done with the first one, the system will serve up the next oldest, and so on, until there are no more.
-
Pick claims: Use this option to create a work queue. Work queues have a couple of benefits that you don't get when you click Work oldest or any of the other Work buttons:
-
You can customize your workflow - picking only the claims you want to work on.
-
You can leave the workflow (yes, even log off) at anytime and return to where you left off by clicking the
 link on the navigation bar. The ability to leave and return is not available when you click the other work buttons.
 -
When you create a work queue, all the claims you select get assigned to you. Because they are no longer unassigned, the number is decremented from the total count on the Dashboard. This means that other associates will not be trying to work the same claims.
-
-
Incomplete - Verify duplicates
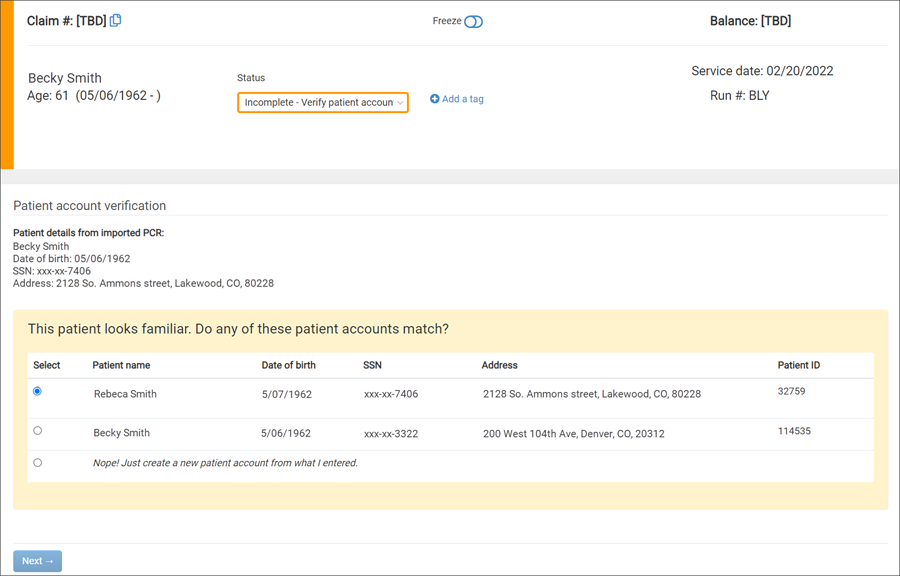
To prevent duplication of patient records when importing a PCR, ZOLL Billing conducts a thorough search of existing records to identify any that share the same name, date of birth, and/or address. If one or more records match these criteria, a number will be shown next to the "Incomplete - Verify duplicates" button on the Dashboard, along with a "Work" button.
-
Click the Work button to view a list of matching patient records.
-
If one of the records match, click the button to the left of the listing. If no records on the list match, click the Nope! line to create a new record.
-
If you selected a record from the list and that patient already has a claim with the same service date as the imported claim, the claim information will display. Review the information. If the imported claim is a duplicate of an existing claim, click Yes, merge this claim. If it is not, click No, create a new claim.
-
If there are more claims that need verification, you will be served up the next claim for review. If there are no more, you will be sent to the Dashboard.
Pick claims - create a work queue by DOS
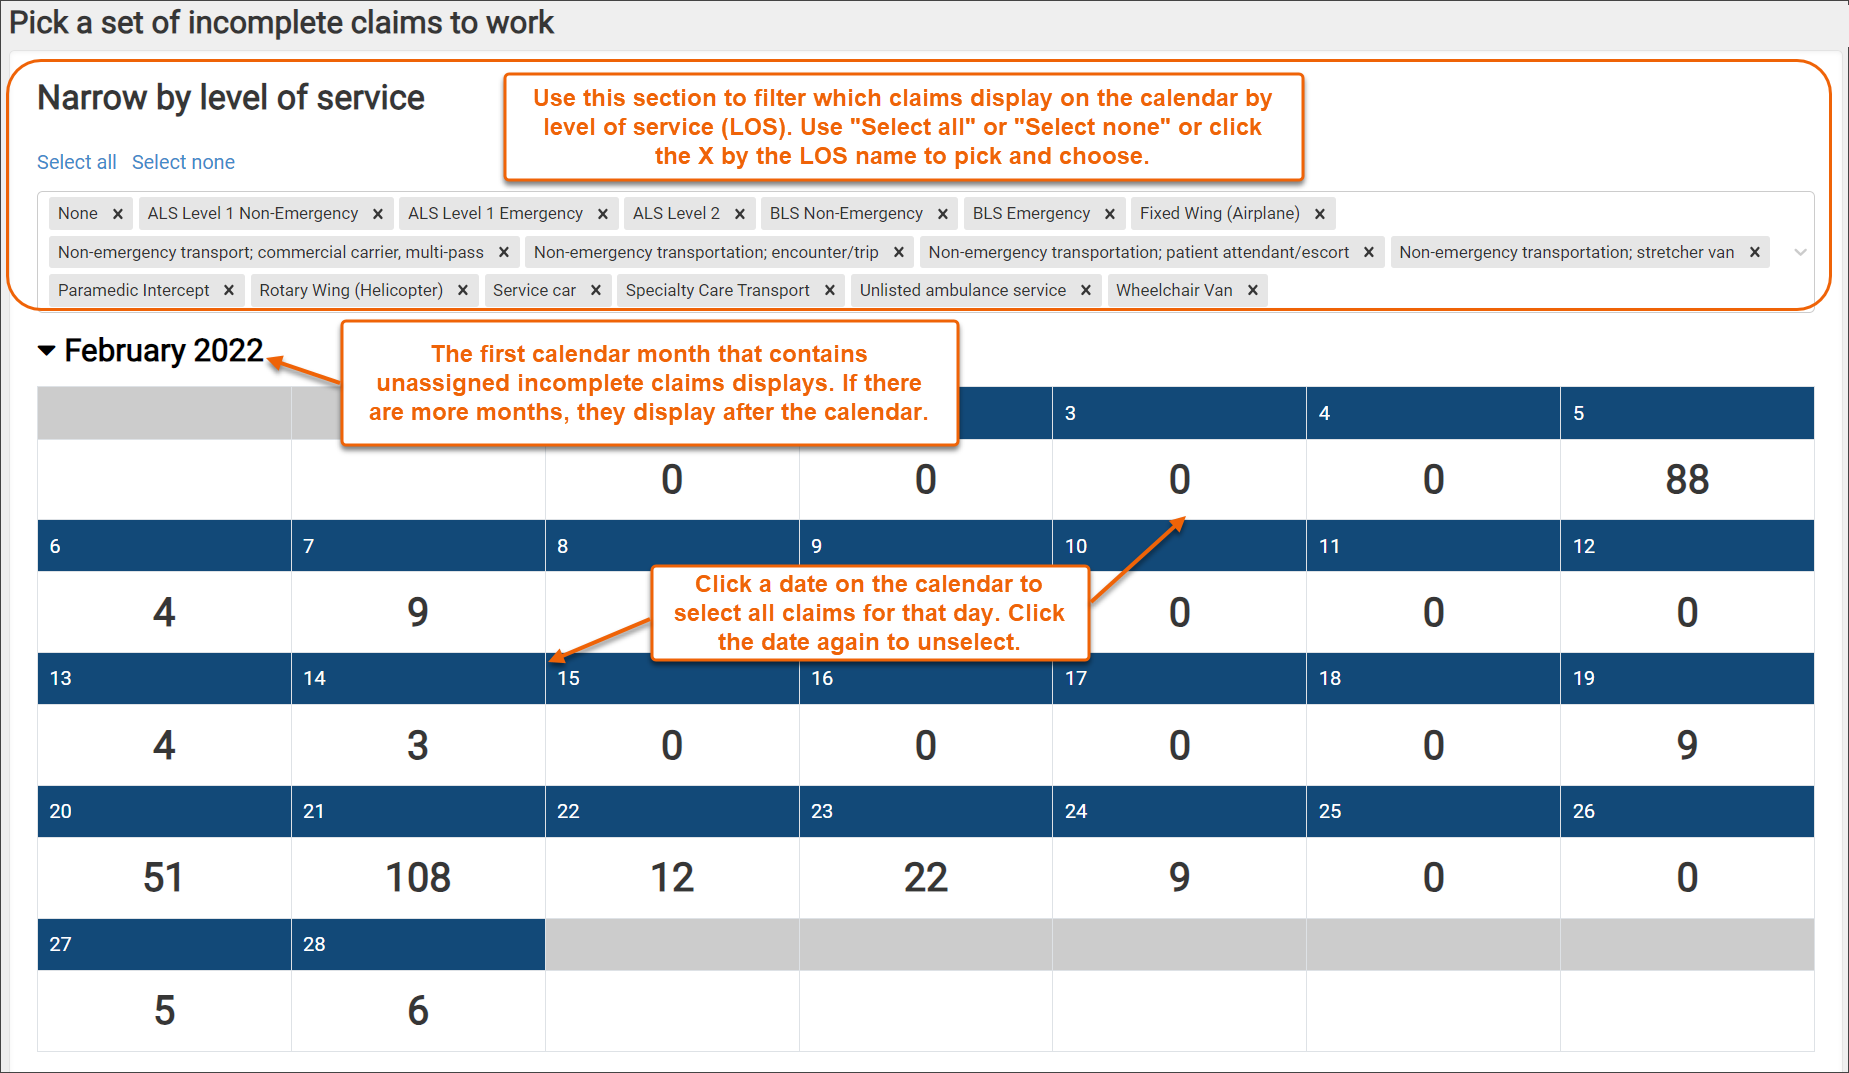
Create a customized work queue by date of service. Use the level of service types at the top of the page to filter your selection.
-
Click Dashboard on the navigation bar.
-
If you have incomplete unassigned new claims in the system, a "Pick claims" button displays. Click Pick claims.
-
Use the list of level of service types at the top of the page to filter claims. For example, if you want to build a work queue with claims that have a level of service of A0426 ALS Level 1, get rid of all other level of service types and then select the dates from the calendar.
-
The first calendar month where unassigned incomplete claims exist displays by default. If you have claims in months that are more recent, scroll down to access those months.
-
To select a date, click the box on the calendar. The box highlights in yellow. If you made an error, deselect the box by clicking it again.
-
When you are done selecting the dates, click Work selected claims.
After you establish a work queue, you will see a  link display in the navigation bar. This link provides a couple of functions:
-
Use it to return to your work queue from any page in ZOLL Billing.
-
Since a work queue is saved for seven days, if you see
it is a reminder that you have an established queue.

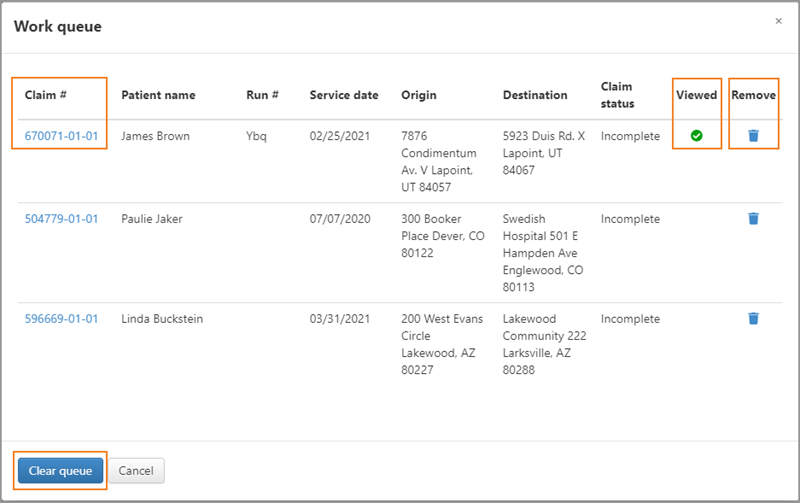
The "View my queue" button opens a window that shows:
-
A list of claims in your queue, ordered by date of service, and then run number (in ascending order)
-
Claims you have viewed
Use this window to:
-
Jump to another claim on the list by clicking the claim number
-
Delete claims from the queue by clicking the trash icon
-
Delete the work queue by clicking "Clear queue" (work queues will be deleted automatically after seven days)

Click the Skip to next claim button to leave the current claim and go to the next.
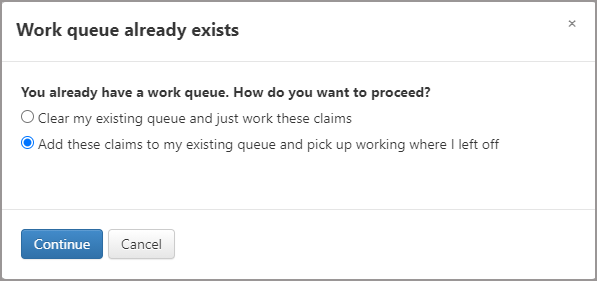
Adding a claim to an existing work queue
-
Click Dashboard on the navigation bar.
-
Click Pick claims.
-
To select a date, click the box on the calendar. The box highlights in yellow. If you made an error, deselect the box by clicking it again.
-
When you are done selecting the dates, click Work selected claims.
-
On the pop-up window, select Add these claims to my existing queue and then click Continue.
Clearing claim ownership
Claims in your work queue will be assigned to you until you either clear the work queue or the work queue expires (after seven days). Before you create another work queue, ensure that you complete and submit the claims that you previously selected. If you do not, and you no longer want those claims assigned to you, use the following steps to clear the assignment:
-
Click Advanced Search.
-
Under the "Claim Information" heading, click the Claim status column. Select Incomplete from the list and then click Search.
-
On the table that displays, find the Assigned to column and then enter your name in the filter box. Click Search. A list of incomplete claims that are assigned to you displays.
-
Un-assign: Check the boxes associated with the unwanted claims and then click Un-assign selected claims. The un-assigned claims appear back on the Dashboard for selection by anyone in your company.
-
Assign selected: If you want to move claims to another person, check the boxes associated with the claims and then click Assign selected. From the "Assign selected claims to" window, click the Select user field and choose the user's name, then click Assign. The newly assigned claim(s) will display in My Claims.
-
Work oldest
Clicking the Work oldest button on the Dashboard puts you into the incomplete workflow. Once in this workflow, you will be served up the next oldest unassigned claim as you finish the first. This will continue until all claims are submitted or suspended. When this happens, a happy face replaces the "Work oldest" button.
If you need to leave this work queue for any reason, you can come back to the Dashboard and click Work oldest to start up again.
Adding notes and attachments
Both attachments and notes can be added on any page in the incomplete claim workflow.
Add notes as you work the claim. For example, if you clicked Save and exit you may want to create a note as to why.

Attachments allows you to view existing attachments and add more if needed. The attachment opens in another tab so if it contains information that you need to work the claim, leave it open on another monitor for reference.
