Configuring a Profit Center
Enabling profit centers and defining the type
To begin, you must enable profit centers and define the profit center type. Profit centers can be geographical regions or names for defining groupings or buckets.
-
On the navigation bar, click Settings.
-
On the Settings page, click the Profit centers tab.
-
Check the Enable profit centers box.
-
Select a profit center type - Geographical Zone of Transport Origin or Name.
-
Click Save.
Naming a profit center
If you are tracking level of service, materials, time of day, etc., then creating profit centers by name is the way to go. Before you start, it is a good idea to sit down and make a list of names that represent what you are tracking. When the list is ready then:
-
In the Name field on the Profit Center page, enter the name representing this profit center.
-
Click Add.
-
Keep entering names and clicking Add until you have all the profit centers identified.
-
When you are done, click Save.
And that is all there is to adding profit centers by name!
Modify a profit center name
-
On the navigation bar, click Settings.
-
On the Settings page, click the Profit centers tab.
-
Find the name of the center you wish to change and click in that field.
-
Make the name change and then click Save.
Delete a profit center name
-
On the navigation bar, click Settings.
-
On the Settings page, click the Profit centers tab.
-
Find the name of the center you wish to delete and on that same line, click the trash can.
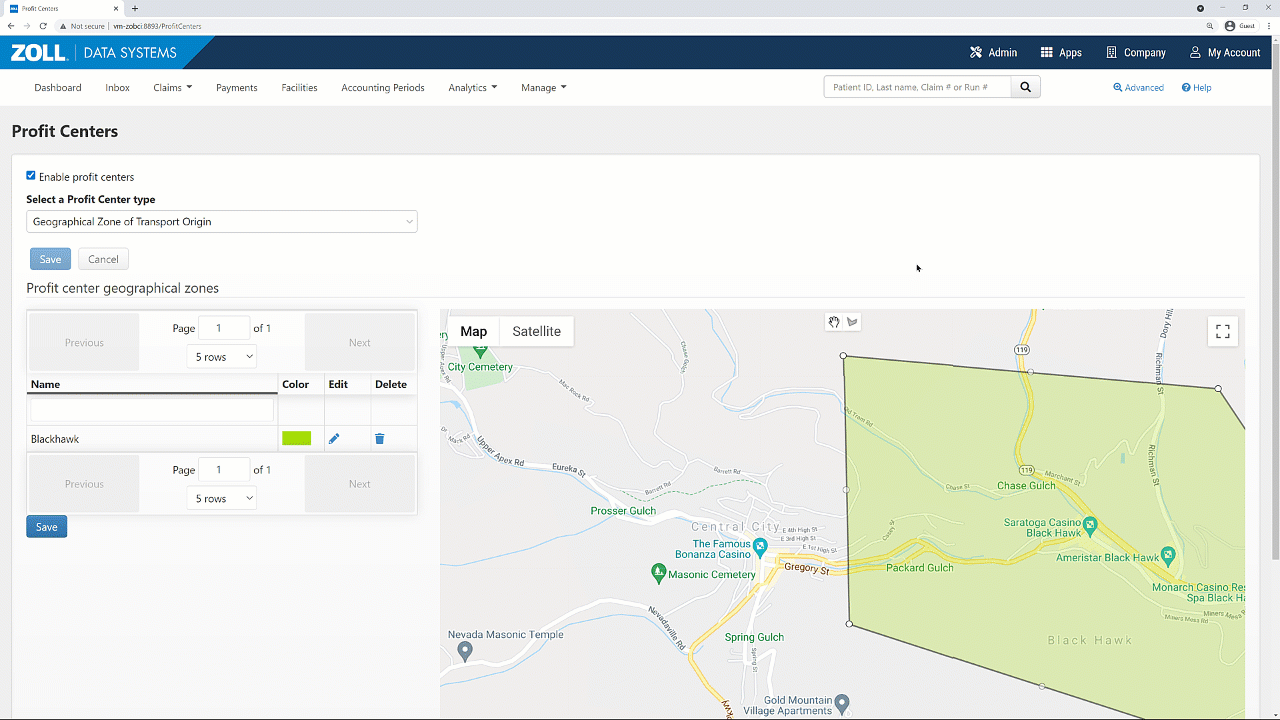
Geographical zones
Using the profit center map
 : Located on the lower right corner, the plus zooms the map out, the minus zooms the map in.
Map: Located at the top right corner - click to see the street map view. Click Map > Terrain to show street map view with topography and elevation.
Satellite: Located at the top right corner - click to see the satellite imagery. Click Satellite > Labels to see location names and businesses.
 : Located in the top middle - click to start drawing.
 : Located in the top middle - click to stop drawing. Also used to drag the map around the screen and modify the lines on a zone.
Creating a profit center zone
-
Click
and then click the place on the map to start drawing the zone. You will see a round dot with a line. -
Continue clicking locations on the map until the line meets the beginning dot - the zone can be any shape. Click
to stop drawing. -
Under the 'Profit center geographical zones' heading you will see a line that reads 'Not named'. Click the edit icon on that line.
-
In the window that pops-up, enter a name for the zone and select a color. Click Apply.
Modifying the zone boundaries
-
On the Profit Center page, click
. -
Grab a pin on the boundary and drag it to the desired map location. As you drag a pin, a dot displays in the middle between two pins. Continue this action until you have the desired boundaries.
-
Click Save.