Facility Invoices
Preview and generate one or more facility invoices using the Facilities page.
To get to the Facilities page, click Facilities on the navigation bar.
Note: Facility claims must be submitted before they will appear in the With outstanding balance tab. If you don't see the claim charge you are looking for in this tab, go back to the Claim page and see if the claim has a submitted status.
The facility amount due is used to calculate the facility invoice balance. The facility invoice amount will reflect the total amount of the claims on the facility invoice. A payment from a payer other than the facility to a claim on the invoice will not affect the facility balance.
Previewing a facility invoice
Previewing a facility invoice is a good way to ensure its accuracy and obtain an understanding of the final invoice's appearance. When you click the Preview invoice button, a PDF will display with a clear, "Preview" label to differentiate it from the official invoice. Once you have reviewed the preview invoice, make corrections if necessary. When the invoice is accurate, click the Generate invoice button to create the final version.
To preview an facility invoice:
-
On the navigation bar, click Facilities.
-
Click the With facility balances tab.
-
Click the name of the facility.
-
Click the Queued claims tab. A list of claims that have yet to be invoiced displays.
-
Click the Preview invoice button.
-
Check the invoice due date.
-
Click the radio button next to the desired format. Read more about each format here.
-
Click an output option.
-
Click the Preview button.
A PDF will open in a new tab in the selected format. You can print or download the preview invoice.
Generating a facility invoice
Use the following instructions if you have previewed the facility invoice and are ready to generate it.
-
On the navigation bar, click Facilities.
-
Click the With outstanding balance tab.
-
Click the name of the facility.
-
Click the Queued claims tab. A list of claims that have yet to be invoiced displays.
Check the invoice period: The invoice will include all the claims with service dates that fall within this date range and any claims prior to the range that have not yet been invoiced. For example, an invoice was generated for January. In February, a claim was created with a service date of 1/31. This claim will be included in the February invoice because it was not yet included in an invoice. To change the upcoming invoice end date, click the edit pencil, enter a new date, and then click Save.
-
Click the Generate invoice button.
-
Because a generated facility cannot be undone, you will see a confirmation window asking you if you are sure you are ready. If you are, click Yes continue.
-
Change or verify the Invoice due date: The expect payment date will display on the invoice.
-
There are several ways to format the invoice. If you have not done so already, go back and use the preview function to view practice invoices using various formats. To select a format, click the format's radio button.
-
Click Generate. The invoice can be downloaded or printed.
Tri-fold the printed invoice and place it into a #10 business envelope. Ensure that the facility address displays in the envelope window.
Facility invoice format options
Format types
There are several invoice format types from which you can choose:
Only display amount(s) due on invoices/1500s: Select to display only the amounts due on the invoices/1500 and not display contractual amounts. This type can be used alone or in combination with other types.
When choosing this setting:
-
Box 24F will reflect the amount due after contractuals are subtracted for each charge
-
The "Price per unit", "Charges", "Contractual", and "Paid" columns will be hidden on the invoice
-
Box 28 will reflect the amount due after contractuals are subtracted for all charges
Generate 1500 with invoice: Both a 1500 and an invoice can be generated at the same time. This type can be used alone or in combination with other types.
On the Facility page > Queued claims tab, there is a new checkbox titled "Generate 1500 with invoice" that displays when you generate or preview an invoice.
When choosing this setting:
-
The "CMS 1500 Options" section appears below the selection area, allowing customization of the 1500 form.
-
It functions with any invoice selection under the "How do you want to bill?" heading.
Note: If the "1500 per claim" option is selected in conjunction with the "Generate 1500 invoice" option, only one 1500 will generate. -
The same invoice number will be used for both the 1500 and the invoice.
-
Both the invoice and the 1500 will display when viewing the invoice after it is generated.
Generate CSV with invoice: Output the data found in the invoice to a CSV file. This type can be used alone or in combination with other types.
Output options
For each format type, there are several output options to choose from:
-
Single invoice with all claims (together): Generates a facility invoice with all the claims together
-
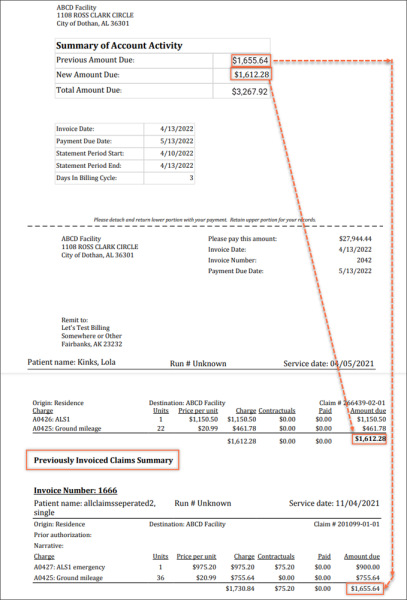
Single invoice with all claims (together, including past invoiced claims): Generates a single facility invoice that shows the newly submitted claims followed by previously submitted claims. This format allows the facility to reconcile the amount shown in the "Previous amount due" field with past invoiced claims. (click image to enlarge)
-
Single invoice with all claims (separated): Displays a single summary page followed by one claim per page for each claim being invoiced.
-
Separate invoice, one per claim
-
1500 per claim
-
CSV: A CSV can be generated on its own, or in combination with another invoice type or formatting option. For example, you can generate a 1500 with an invoice as well as a CSV.
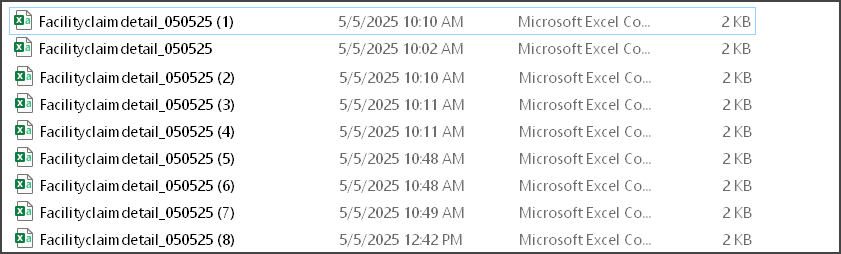
Note: If "Generate CSV with invoice" formatting type is checked as well as the CSV radio bullet option under "How do you want to bill?", only one CSV will be generated.If a CSV file was included in the generation of an invoice, a duplicate copy will generate every time a user views a past invoice for that facility. For example, on the facility page > Past invoices, clicking the invoice date will generate a duplicate of the CSV file that will display in your Downloads folder on your PC. The name of the file will be Facilityclaimdetail_Date (the date the invoice was generated). If the file is a duplicate a number will be appended to the file such as Facilityclaimdetail_050525 (2). The number will increase each time the file generates.

Removing a claim from a facility invoice
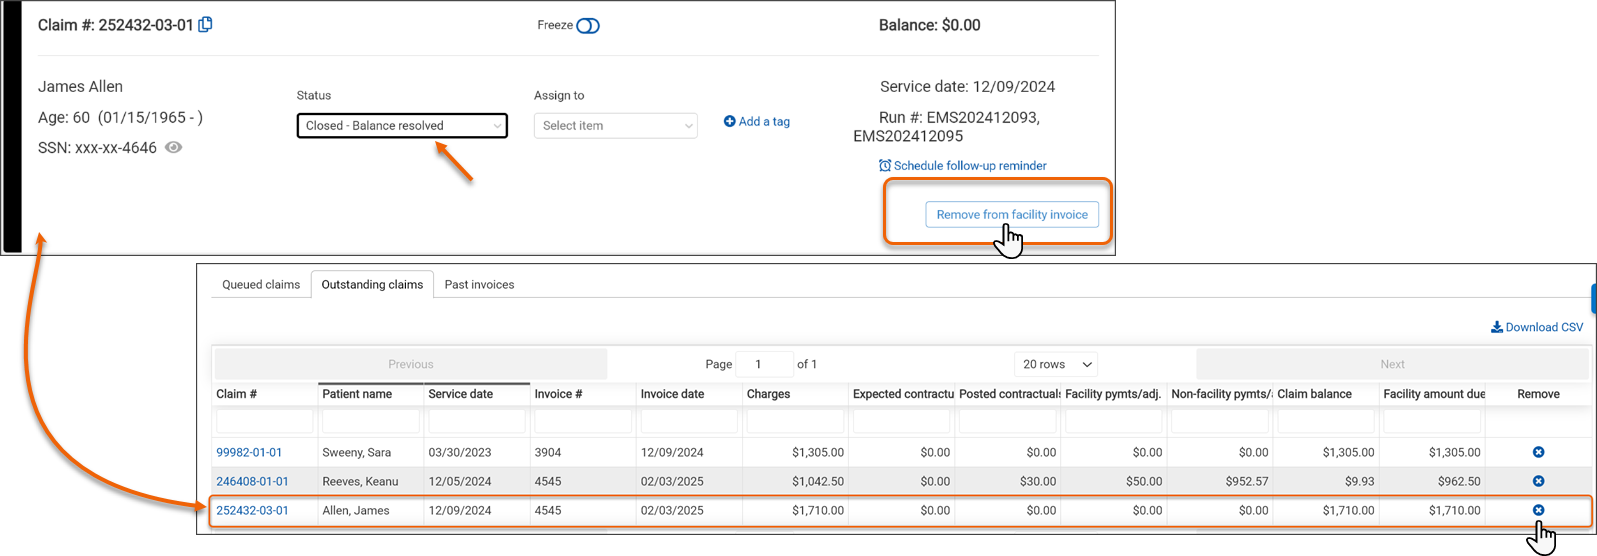
Use the Remove from facility invoice button to the Claim page or click the Remove icon on the "Outstanding claims" tab to remove a claim from a facility.
If there is a full payment from a non-facility payer that zeros out the claim's balance, resulting in a "Closed - balance resolved" status, the facility invoice total amount due will not be affected. To remove the closed claim from the invoice, a user must manually click the Remove from facility invoice button on the Claim page or click the X on the line associated with the claim on the Facilities page > Facility name > Outstanding claims tab.
When you remove a claim with a balance:
-
The claim is removed from the facility invoice
-
Any contractuals on the claim for this facility will be auto-reversed
-
The claim’s status changes to "Suspended – Verify COB"
When a claim is automatically removed from the facility invoice
If the current payer is the facility on a claim and you:
-
Change the claim’s charges
-
Move away from the facility on the COB so that the current payer is no longer a facility
-
Mileage or LOS and update those charges
Then:
-
The system removes the claim from the facility
-
If there was a charge/mileage/LOS change then the claim’s status changes to "Follow-up – Charges corrected after submission"
-
If you are changing the COB so that the facility is no longer active, the claim’s status changes to "Suspended – Verify COB"
When the CO-45/contractuals are automatically reversed
-
Not reversed - When you use the move to next or move to previous payer buttons
-
Reversed - When you:
-
Remove a claim from a facility invoice
-
Change the charges when a facility is the payer
-
Change the COB such that the facility payer is no longer active
-
What to do if you incorrectly charged a facility
If you billed a facility and then noticed that the charge on the claim was incorrect, you can fix the incorrect charge and then send the facility a new statement.
-
Go to the Claim page for the submitted claim. The status for this claim will be "Submitted - Facility invoice."
-
Click the Charges tab and then click the edit icon.
-
Update the charge(s) on the Claim page.
-
Click Save changes.
-
Click Resubmit to payer.
-
Click the Facilities on the top navigation bar.
-
Find the facility on the list and then click the facility name.
-
Click the Queued claims tab. Your newly edited claim will display in this tab.
-
Click the edit icon next to the 'Invoice period' field and select the correct date.
-
Click Generate invoice. A new invoice will display with the updated charge information.