Manual Claims
Create a manual claim
-
On the navigation bar, hover over Claims and click Create Claims.
-
On the first page, all fields are required with the exception of the middle name and the social security number.

When you click Next, the system builds the claim using the information you provided. You will see the claim number on the top right of the next page.

From this point forward you can add notes or attachments to this claim on any tab.
 Note: You can move backwards to a previous tab if needed. For example, you can move from "Level of service & diagnosis" back to "Patient details" to change a patient's address or phone number.
 -
"Patient details" is next. The system automatically runs patient demographics and displays the results. If there is a discrepancy (shows "Replace in account") or the results found information that you don't have (shows "Add to account"), you will see an icon and an action that you can take. In the following example, the results found a phone number that you didn't have and is asking if you want to add it to the account.
USPS verification: The entered address is verified with the USPS. Any color but green indicates that an issue was found.

If you do not have insurance for this patient, click the Find this patient's insurance for me button. We will retrieve this information and show you the results on the COB tab.

-
Click Next to view "Transport details." Fill in the necessary information. When you are done, click Next.
Note: Creating a round trip is covered in Step 8. -
You are now on the "Coordination of benefits" tab.

If you clicked the find insurance button on the "Patient details" tab, the results show at the top of the page under "Insurance details collected during incident."
If you did not click the find insurance button on the "Patient details" tab and now you want us to search for you, no worries. You can run Insurance Discovery on the COB tab by clicking Find insurance.
Notes:
-
If Insurance Discovery finds a red flag, warning, or low confidence score, we alert you. For example, a date of birth partial match warning would indicate that the date of birth we found did not match the date of birth that you have. If you see one of these warnings, click 'More info' to see the information provided by the payer. Check the information to ensure that this is your patient and you do want to add the results to the claim.

-
Search results are marked with a date and held in memory. If you want to run them again, click Search again.
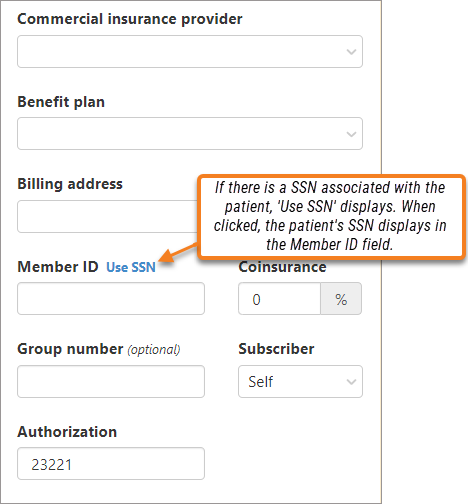
Member ID: In some cases, the patient's SSN is used as a member ID. If there is a SSN associated with the patient record, a "Use SSN" link displays. When you click the link, the patient's SSN displays in the Member ID field.
-
-
Click Next.
-
Your next step is to determine the level of service. You may want to keep in mind the payer when filling out this page, some payers will not accept some levels of service as well as some ICD-10 codes (example: some state Medicaid will not accept an ALS 2).
-
Level of service: Click on the "Level of service" field to select one from the list. The level of service favorites display at the top of the list shown with a start next to the name.
-
Place of service: The place of service will auto populate with a 41 or 42 depending on the level of service you select. If you do not want a 41 or 42, click the Place of service field and select a different code from the drop-down menu.
Note: Once you manually select a code to anything other than 41 or 42, it will remain in the "Place of service" field even if you change the level of service.Code Description Code Description 9 Prison/Correctional facility 41 Ambulance land 12 Home 42 Ambulance air 13 Assisted living facility 49 Independent clinic 21 Inpatient hospital 50 Federally qualified health center 22 On campus - outpatient hospital 54 Intermediate care facility/individuals with intellectual disabilities 23 Emergency room - hospital 55 Residential substance abuse treatment facility 24 Ambulatory surgical center 65 End-stage renal disease treatment facility 31 Skilled nursing facility 72 Rural health clinic 32 Nursing facility 99 Other place of service
-
-
Diagnosis: Start typing the diagnosis code or description and then select it from the list that displays.
Diagnosis Favorites: If you frequently use the same codes, take a look at how to setup Diagnosis Favorites. They will speed up the selection by showing at the top of the list highlighted by a star.
-
The last tab deals with charges. Having trouble with the charges section? We can help! We have a whole section that explains charges.
-
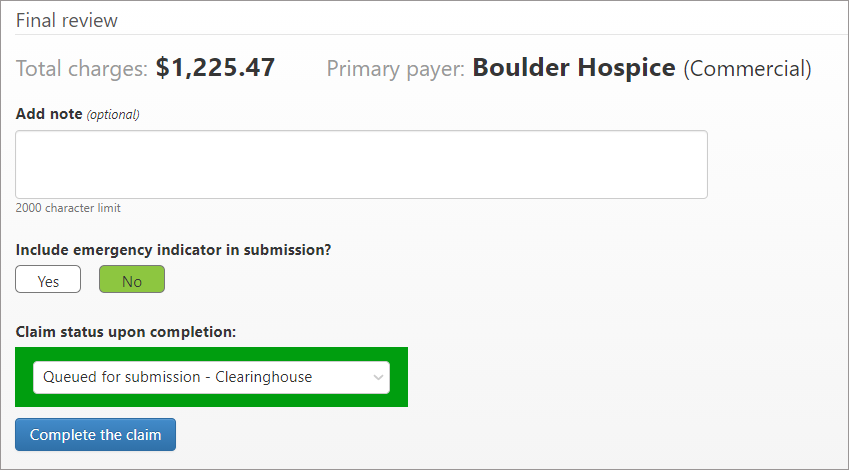
After verifying the charges, scroll down to the bottom to do a final review.
-
Verify the payer and the charges. If either are not correct go back, using the tabs at the top of the page, and correct the issue.
-
Notes can be added at anytime during the creation of the claim. You can find the notes link at the top right corner. The "Add note" field gives you an additional opportunity to add a note before you complete the claim.
-
Include emergency indicator if needed.
-
The "Claim status upon completion" box defaults to "Queued for submission." If you are ready to submit the claim to the clearinghouse, click Complete the claim. If you are not ready, click the status box, and then select the suspension reason from the list. After selecting the reason, click Complete the claim.
-

Finding incomplete claims assigned to you
If you quit anytime during a manual claim creation, the system automatically assigns the incomplete claim to you. You can find it in your Inbox and on the Dashboard.
Inbox:

Dashboard:

Reassigning incomplete claims
Anytime during the claim creation process, a claim can be reassigned to someone else.
-
Click on the incomplete claim in your Inbox or find in through the Dashboard (see above section).
-
Click the edit icon next to the "Assigned to" field and select a name from the list.
The incomplete claim will now display in the Inbox of the person you selected.